BLOG

Thursday, March 31, 2016

How To View Our Bench Models in 3D


We're analog types. That's why we publish our bench plans on paper. These are far more quick to reference during a build than a computer. It's the same reason you see construction workers on site with a roll of blueprints under their arm and not a laptop. Unless that's a hoagie I've been seeing...

But our 3d eDrawing is quite useful for checking how certain components of the bench interact with each other, or for checking a dimension when you're in your office after shop hours. Here's how to do it.

First, download the Solidworks eDrawing viewer by clicking here. On this page, click on the download button. That will take you to a page where you can choose your download depending on your operating system (Windows/Mac.) What you want is the eDrawings Viewer. After a couple more questions (the usual user agreement stuff) you'll be downloading the software.

Once you install the software, download the 3d eDrawing of the Split Top Roubo or Shaker Bench from our Downloads page. They are listed under an image of each bench.

Open the eDrawings program, then open the file. Here's what you'll see:


You'll notice the Shaker Bench doesn't show a Crisscross. If you're building a Shaker Bench, there are instructions in the Construction Notes that cover this.

Navigating eDrawings is easy. The controls are fairly self explanatory. The hand tool lets you pick parts up and move them around. The tape measure lets you, well, measure things. Just play around with it and you'll learn it in just a few minutes. Don't worry, you can't screw up the model. If you've moved too many things around and can't get them back in place, simply open the file again and the model will reassemble itself.

If you're especially cheap frugal you could easily build the bench with this free software and model, without the printed plans. We've build many of these benches though, and always have the printed plans at hand.

Here's a couple videos on navigating eDrawings. The software version is a bit out of date, but the icons are pretty much all the same in the new one.


Monday, March 28, 2016

Holdfasts in Stock , Plate 11 Leg Vise Forged Parts


We again have our hand-forged holdfasts in stock. Price is $199 plus shipping (domestic shipping will be added in cart, for International please email us.  For more info on our holdfasts, see this.

These can only be bought here, we won't add them to our Store page.  SOLD OUT


We have two sets of iron parts intended for use with a Roubo Plate 11-style leg vise screw. These were made earlier this year by Peter Ross. They are typical Ross work. In other words, you couldn't get closer to the original if you were personal friends with H.G. Wells.

To make the rings easier to fit, we lightly machine the inside of the ring ferrule so it's truly round. If you've seen one of these, you'll be amazed at how little material needs to be removed. Ross makes these without any sort of form, just hammer and anvil with welded ends. They are gorgeous.

One end of the handle is removable. Simply tap out the taper pin, remove the ball, install on vise screw, replace ball and pin. Ross filed a witness mark across the ball and tenon so reassembly is easy.

We've only got two of these, and won't be making more. Price is $220 for the set of 1 ring ferrule, 1 handle. Shipping is extra.

If you'd like to purchase, send an email to info@benchcrafted.com and include your mailing address. We'll send you an invoice which we ask you to kindly pay promptly.

Thursday, March 10, 2016

FORP Plate 11-style Holdfasts For Sale


We have a few leftover Plate-11 style holdfasts available. We made extras last year, but didn't sell all of them at the FORP. I think there are perhaps a dozen left.

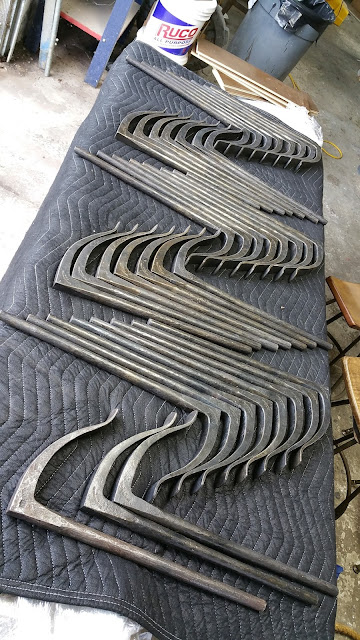
These are not to be confused with the holdfasts that we produce. Rather, these are based off the Plate-11 engraving. An original "Plate 11" holdfast from Peter Ross was used as a prototype. Peter was having some issues with his elbow when we needed these, so he gave us the okay to make a few after his model in order to have them by the FORP. These are stamped with the Benchcrafted moniker.
Ross' prototype can be seen at the very bottom of the picture above. The holdfasts are made by our smith who also produces our standard hand-forged holdfast. They are excellent.

Important note. These are not a regular item, and we have no plans to produce them. If you want a Plate-11 style holdfast after these are gone, you'll need to commission Ross to make you one. These are his baby.

Price is $220, including domestic shipping. To purchase, follow these instructions:

Send a check for $220 to:

Wyatt Childs Inc.1598 Johnstonville Rd, Barnesville, GA 30204(770) 358-0501

Include your name, phone, and shipping address in the envelope, along with exactly what you want (quantities, in other words)and you'll receive your holdfast(s). The included shipping is for one holdfast. If you want more than one, you'll have to arrange with Childs.

You can try to call Wyatt Childs at the above number, but really the best way to get a holdfast is the method above. Childs does take credit cards, so if you must pay that way, call.


Saturday, March 5, 2016

Buckner's Edge Dogs

We received this note from plane maker, BBQist, and speed skiing expert Brian Buckner a few days ago. We remember seeing this is Landis' "The Workbench Book" (now almost 30 years old!). Handy little buggers, and looks like they work great with our Tail Vise. One addition we'd suggest to the design. Lengthen the width of the jaws between the dowels for holding narrow stuff. You'll get the functionality of an open-front, moving-block tail vise, without any of the disadvantages. 


I wanted to share with you the recent additions I've added to my Shaker bench (outfitted with your leg and wagon vises) that I built based loosely on the one that Ron Brese built and Benchcrafted published plans for. These additions are called "Bench Puppies" or "Edge Dogs" depending on the source. I built mine based on a recent article in Fine Woodworking that was written by a student of James Krenov. It seems that these holding devices are popular at Krenov's College of the Redwoods school. Also, these devices are mentioned in Scott Landis' "The Workbench Book" (pages 108 & 109). He even shows some "store bought" versions (but I've never seen any myself).
 
In short these simple devices are fantastic! They hold items very securely and really broaden the holding capacity and versatility of my bench's wagon vise. Certainly well worth the meager time and materials required to build them. I used scrap and about an hour of time building mine.
 
The FWW article presents and discusses them in the context of a bench equipped with a traditional tail vise. Since the wagon vise is a close cousin of the tail vise (but much better in my opinion) I thought I've give them a try. I was at first a bit curious if they would work in a wagon vise since they would have to span and ride along the fixed benchtop front laminate. I was a little concerned that they might be prone to binding. In use this has not been the case.
 
A couple other concerns I had included the suitability of using a round peg in my square dog holes. I had considered making a special square dog that would have a round hole for the device's "peg". I'm glad I didn't waste my time pursuing this as the "round peg in the square hole" seems to work just fine. I was careful to turn the dowels to a close fit for the bench dog holes since a smaller peg would just introduce "slop" and might cause some problems. I was also wondering if the 2 degree forward lean that is built into each of the existing dog holes would have a negative impact. I was pleased to find that it does not appear to affect the functionality of these devices in any way.
 

I followed the basic construction techniques shown in the FWW article but digressed in a few places. Rather than glue the heel block on and then fit the peg as the article shows I chose to reverse the steps. I first fit the peg into the body of the device then placed that assembly into the dog hole of my bench. This allowed me to then ensure that the clamping face of the block was perfectly perpendicular to the front laminate. I clamped the body in place and then glued and clamped the heel in place. I've been wondering if it might be advantageous to cant the clamping face a degree or two out of perpendicular (leaning inward towards the front laminate) as this might increase the holding power of these devices even more.