Tuesday, September 9, 2014

Hand Candy


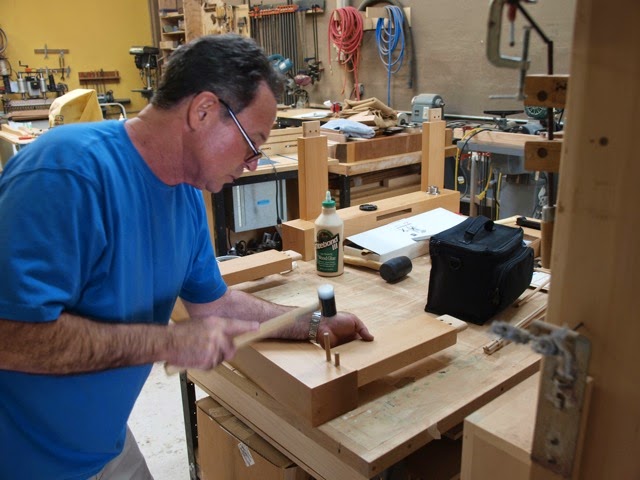
Customer David Keeling sent us a nice email and some photos of his Classic Leg Vise-equipped bench this morning. Gorgeous. We love crisp, clean work like this. Below is David's email:
________________

Subject: Thank you for the super hardware!

Thank you for the criss-cross and classic vise. Below is my European beech bench, shelf and dog hole yet to do, but the vise runs sweet and true.

The Crisscross mounting pin holes that you see are on one side only.  The chop is 8 and 1/2 inches wide which exceeded the length of the mounting pin so I made a choice of treating one side as a "show side" with no holes at all.  I made the leg 5 and 1/2 inches wide giving me 1 and 7/8 inches of wood on either side of the mortise for the Crisscross.  I drilled 1/4 inch shy of all the way through the leg then on the "working side" of the vise drilled a 3/4 inch hole centered on the pin hole 1/4 inch deep to allow me space to grab the pin for removal.  That left 1 and 5/8 inch of beech on each side to support the pin which I hope you concur will be enough.  I did mean to say holes for holdfast but I did make bench dogs out of 3/4 inch hickory dowels that I plan to use in concert with the holdfast and battens for work holding.

I think there will be more orders coming your way.  Three cabinet makers kindly let me use their air conditioned shop to build my bench.  They renamed your vise "hand candy" as everyone who came through their shop and tried it was amazed at how effortless the operation was.

Again in appreciation,

David Keeling


Monday, September 8, 2014

DymondWood is No More


In March we announced that we'd be replacing our Cocobolo knobs with DymondWood, an acrylic-infused and pressure-laminated plywood product that looks very much like Cocobolo, but has none of the drawbacks of rare rosewoods.

But it turns out that DymondWood is now rarer than Cocobolo. Sadly, the company that manufactured DymondWood completely burned to the ground a couple weeks ago. Rutland Plywood of Rutland Town, VT, was totally lost in a 5-alarm fire on August 21.

Right now we're not sure what we'll be replacing the DymondWood knobs with. With cocobolo now on the CITES list, we're not keen on replacing the knobs with anything in the Dalbergia family. And plain acrylics or plastics just don't cut the mustard for us. After true rosewood, and the excellent DymondWood, everything else seems like a downgrade. And to our knowledge, no one is making a DymondWood-like product.

Next week we'll be turning some samples in various woods (likely acrylic infused) to see what might fit. We'll be shipping Glide M leg vises and Tail Vises with what remaining DymondWood stock we have. We estimate we'll be out in about two months at best.

The New Glide - Top Clearance


We've received a few emails over the weekend about the new dimensions of the Glide M and C. Here are some clarifications.

The Glide M handwheel is identical to the previous model, save for the locations of the knob mounting holes. The wheel itself has not changed. It's the same diameter, weight, and depth. Again, no changes other than the knob locations.

The Glide C also has the exact same specs as the Glide M (diameter, etc.), except it has a sand-cast surface, not machined.

The overall radius of the Glide M and Glide C handwheels is 6-1/2". That's the distance from the center of the acme screw to the tip of any of the knobs.

Here's where you might run into trouble. If you position the Glide less that 6-1/2" from the top of the bench to the center of the screw, the knobs will be above the top surface of the bench when in the 12 o'clock position.

But here's also why no one should ever run into this situation. In the vast majority of benches there will be oodles of room between the benchtop surface and the top of the Crisscross hardware. In an average bench (height 34") you can start the Crisscross mortise 1" above the floor, mount the Glide 1-3/4" above the Crisscross, and still have over 11" above the screw. That's huge. See below.


And if you're bench is really, really short, like 29", you can still mount the Glide and Crisscross without the knobs breaking the top plane of the benchtop. See below.


So, to sum up, mount your Glide and Crisscross as low as you can (we repeat this numerous times throughout the installation instructions). There is no reason to mount it higher, and thus sacrifice capacity above the screw.


Friday, September 5, 2014

French Oak Bench - Flattening Session 3


Yesterday was shop cleaning day. I had just finished a week long project building two English-style field gates (more on that down the road) and the shop was trashed. Cedar shavings and dust were everywhere. The shop smelled incredible, but I couldn't walk in it. I also found a dead mouse in the shavings. Actually, it wasn't dead, just stuck in the trap and flopping around. I chucked the whole works into the woods behind the shop, then walked back with my head hung low. I asked God to forgive me for killing one of his precious creatures. Then I ate some fried chicken, thanking God for that precious creature.

So with all the shavings around, and on the hottest, stickiest day of the year, I thought it was time to flatten the Plate 11-style, French Oak bench again.

Last February I flattened it for the first time after the initial flattening (so technically the second time), removing about 1/8" from the dead center of the top (across the width). It's heart side up, so it crowns. This time, about 7 months later, the crown was about the same.


The odd thing is, the underside of the top wasn't cupped all that much. Technically speaking, you'd think there'd be about 1/4" gap in the middle (1/8" in February plus 1/8" couple days ago) but it was more like 1/16". I think what's happening is that the concave side is doing more of a linear shrink than a curvy one, so, not a parallel curve as with the heart side. I need to look back and see what Hoadley says about this.


The problem with flattening a crowned top is trying to keep the jointer plane from following the crown. I concentrate my effort just in the middle, and literally scrub the top with the plane, pressing down hard and making choppy strokes directly across the grain (90 degrees to the long edges). I don't tilt my plane to empty shavings or prevent them from getting drawn back into the mouth. The latter is really not an issue when traversing since the shavings are not long and durable. I use my breath to blow shavings from the path if they get in the way, again, without lifting the plane. I eat lamb shawarma for lunch, and that makes the breath more powerful for blowing the chunkier shavings I get from traversing. I want to maintain the feel of the sole staying engaged with an imagined flat plane as I traverse along the bench. As long as I concentrate on the middle, I'm usually fine.


Once I've made a couple passes, I check for twist. The red arrow points to the high side of the distant winding stick. My top is out by about 3/16" over the length of the bench (a little over 9'). Normally that wouldn't bother me, but today I was feeling particularly manly. I now take diagonal passes on the high corners to even them out, then make another traversing pass all along the top.


Then I check the length of the bench for flat, since traversing strokes only make it flat front to back. I had two humps directly over these two holdfast holes. I concentrated some more traversing passes in these areas until they were flat with the rest of the top. Then to even it all out I made two diagonal passes along the top. Then, just to make sure I kept the top as stable as possible, I took one pass on the underside of the bench with the plane held upside down. Lamb shawarma can do this.


For the last pass I sharpen the jointer plane with a camber and take two lighter traversing passes across the top to give it a toothy texture. Done. I did take the leg vise off the bench for the flattening operation because I needed to trim the length of the chop by just a bit. That's my St. Peter's Cross (okay, Crisscross) in the bench leg, and without which I would not want to work. Roubo says to place a piece of wood on the floor between the chop and the leg, equal to the thickness of the work, but if Roubo were alive today, he'd be a Benchcrafted customer (ahem).


The theory behind using a top slab with the heart up is partly that when the top moves it becomes concave on the underside and wedges itself onto the legs. This is partly true if my bench is any gauge. The top on my bench has arched up in the middle (as expected) so it's actually risen off the legs more at the rear of each leg than the front. Not by much, but its still visible. These joints were tight when we drove the top on last year, as below. Ignore the space between the tenons. That's end grain that got mashed down when I let Jeff Miller do some work on my bench. Never. Again.


My label also shows evidence of the movement. Next year at the FORP II, we'll figure out a better place to attach our labels. And this time we won't glue them to our cracks.


Tuesday, September 2, 2014

The French Oak Roubo Project Part Deux—Registration Open


In the autumn of 2015 a small group of Roubo enthusiasts will gather to once again build benches based on the famous Plate 11 engraving from L'art du Menuisier. And once again, you are invited.

Like last time (read our original announcement here for FORP I) we will get to work with amazing slabs of French oak, in the pastoral setting of Wyatt Child's brick-and-pine joiner's shop in rural Georgia. Child's shop is outfitted with machinery perfectly suited to process these large slabs quickly and efficiently, from the Woodmizer bandmill to the 36" Oliver Straitoplane. Would Roubo have used these machines to process his own bench parts? If he were with us in Georgia last summer, I don't think there'd be any question.

The Enthusiasts

Bo Childs Our gracious host and gentleman extraordinaire
Benchcrafted  Us, obviously
Raney Nelson Daed Toolworks' infill plane maker, yes, he's still alive
Jeff Miller Chicago furniture maker and woodworking ergonomicist
Chris Schwarz Grits provider and pocket hole technician, he also writes now and then
Jon Fiant The Human Saw Stop. Also builds custom workbenches to order in his Atlanta shop.
Ron Brese Local Fishing Guide
Will Myers So good he cuts mortises with a butter knife. Also teaches at Underhill's Woodwright's School.
Don Williams The guy who used to work at a famous place that rhymes with "Smythsonian"

The Format

This is the same crew from FORP I. Almost all of us built a bench to take home during FORP I, and were occupied doing our own work during the week (when we weren't in production mode) but this time around all of the enthusiasts will be there to help and assist the participants in building their benches. So for FORP II we're changing the format a bit. You don't need to be an advanced or even an intermediate woodworker to sign up. There will be plenty of help and instruction. However, this event is not a class, and there won't be any group instruction or formal techniques taught unless you ask. But again, plenty of help and expertise will be available. If you're more of a beginner, you will have over a year to advance your skills and prepare.

The Material

Bo has once again unearthed a cache of 24/4 French oak over in the old country and has shipped it over to his shop in Barnesville. These will become massive, one or two-piece tops.  We mill the tops with the Oliver Straitoplane and finish out between 5" and 6" thick. We'll also be using 16/4 French oak for the legs and rails. Some of the material for the tops will be somewhat green in the core of the slab. This is natural for 24/4 material. Roubo's tops were like this, and the tops we made in 2013 were like this. Once your bench is built and installed in your shop, the tops will settle down fine. To read more in-depth info check out Schwarz's French Oak posts over at the Lost Art Press blog.

Location

Barnesville, GA. Child's shop is an hour south of Atlanta just off I-75. Bo's shop is ideally suited for building massive benches, and Bo himself is an incredibly generous and enthusiastic host. You'll find Wyatt Childs a fascinating place on its own, replete with acres of historic French architectural salvage and antiques. It's like walking into Roubo's boneyard. And if you're in the market for building some great furniture after your bench build, bring a trailer. Bo has a warehouse full of tens of thousands of board feet of everything from chestnut to swamp harvested cypress. And they are all flitch sawn and wide.

The Bench & Accessories

We'll again be building the bench from Plate 11 down to the last detail. We'll cut the joinery close with the machines, then fit everything precisely by hand. If you prefer to cut joints entirely by hand, feel free. The leg vise will be made by Lake Erie Toolworks and the iron fittings (ring ferrule, handle) forged by blacksmith Peter Ross, as will the toothed planing stop, all meticulously modeled from Plate 11. One hand-forged holdfast will also be included.

The Plate 11 bench does not use a parallel guide on the leg vise. This may annoy you, or you may not mind. Read Schwarz's take on his blog (see above link). He built his without a parallel guide. The rest of the FORP I participants used a Benchcrafted Crisscross in their leg vise, and it works seamlessly with Lake Erie's screw. If you'd like to use Benchcrafted vises on your bench, contact us for more info.

The Date

November 8-14, 2015

Sunday evening: meet and greet at Bo's shop, presentation on the Plate 11 bench, history, and more. Light refreshments.

Monday-Friday: We build from about 8am-6pm, or until we drop.

Saturday: Last year Bo kept his shop open for anyone wishing to stay through Saturday and keep working on their benches. Hand tools only, no machines.

Thursday night: BBQ at the shop and open house for friends and family.

The Price

$4800. Includes enough French oak to build the entire bench as illustrated in Plate 11, the French oak leg vise screw and tapped leg from Lake Erie Toolworks, the hand-forged ring ferrule, vise handle, toothed planing stop and holdfast from Peter Ross.

Catered lunch included Monday-Friday.

Participants will arrange for their own lodging (we've made arrangements with a couple B&B's in the area for discounted rates.) Participants will also be responsible for transporting their bench back home after the event. Wyatt Childs can arrange for shipping participant's benches as well.

Participants will bring their own hand tools, portable power tools (i.e. drill, router) sawbenches or sawhorses and sharpening equipment. We'll provide a list to participants of what you need.

If you'd like to sign up, send an email to jameel@benchcrafted.com and we'll send you more details. Registration opens at 10am CST today. Any emails received before then will be put at the bottom of the stack (to be fair its first come, first served) Payment is 50% down, and the rest shortly before the build.

The event is limited to 16 participants. 
Update 9/2: We've got 16 participants. Anyone who contacts us now will be put on the waitlist in case someone can't make it. 

To get a feel for what this event will be like, check out these blog posts:

The FORP Official Report Part 1

The FORP Official Report Part 2

The FORP Video

Monday, September 1, 2014

Now In Stock - The New Glide and More.


Here at Benchcrafted we're always tweaking our designs to make them as sweet as we can. Of course the dilemma in all this is that we risk slighting past customers when we change a product. Here's how we see it. Our past offerings were the best we had to offer at the time. There are companies out there (big ones usually) where planned obsolescence is part of day to day business. Not us. Here, we design and build for the long run, but now and then we get ideas that are genuine improvements and we can't sit on them. Our motivation is to make great stuff, and share it with our fellow woodworkers.


About a year ago we started experimenting with a Glide Leg Vise in our test shop. I've always been intrigued by ship's wheels, and the ergonomics and physical dynamics of why they work. A large wheel gives lots of leverage, and the handles provide an efficient way for a human  to transfer their energy into turning the wheel. If the wheel were without handles, one would have to grip a rather thick section of wheel and use enormous amount of energy just maintaining that grip. My Northfield 16" jointer adjusts by means of a large cast iron ship's wheel. I can rotate it with a single finger on one of eight handles as it moves hundreds of pound of cast iron.


We had a reject bronze Glide wheel from a previous run so we drilled and tapped the rim of the wheel to accept six of our rosewood (now Dymondwood) knobs. We were immediately struck by the improved ergonomics of this arrangement. Spinning the handwheel for gross adjustments was simply of matter of flicking one of the knobs. The wheel, as usual, would spin for several revolutions. We also noticed another improvement. With no knob mounted to the front of the wheel, the entire vise was lower profile--no more bumping a leg into the knob or catching a pocket as you walk by. With knobs oriented symmetrically about the perimeter, the wheel was also balanced, allowing it to spin more smoothly.

But as cool as the six-knob bronze ship's wheel looked (batten down the hatches!) and functioned, we found a problem. Six knobs was three knobs too many, so we removed every other knob. Bingo. This placed a knob at 10 o'clock and 2 o'clock or any point in between. In other words, there was always a knob within easy reach at the top of the vise. Perfect.


But we weren't finished. On the heels of releasing the Classic Leg Vise we decided to swap out the standard single-lead screw (that we've always used on the Glide) for the double-lead screw we use on the Classic. The results? A turbo-charged Glide. One revolution of the wheel now yields 1/2" of travel, vs. 1/4" of the previous Glide. And there's no change in the feel of how the vise holds, due to the effect of the larger lever when adjusting the vise with the knobs (I still grab the rim from time to time.)


The Glide M features our fully-machined cast iron handwheel that is designed, cast, and machined entirely in the USA. The handwheel is outfitted with three Dymondwood knobs turned and finished to a high level in the USA, and mounted with our proprietary fasteners. The Glide M automatically includes a Crisscross mechanism (choose Solo or Retro.)
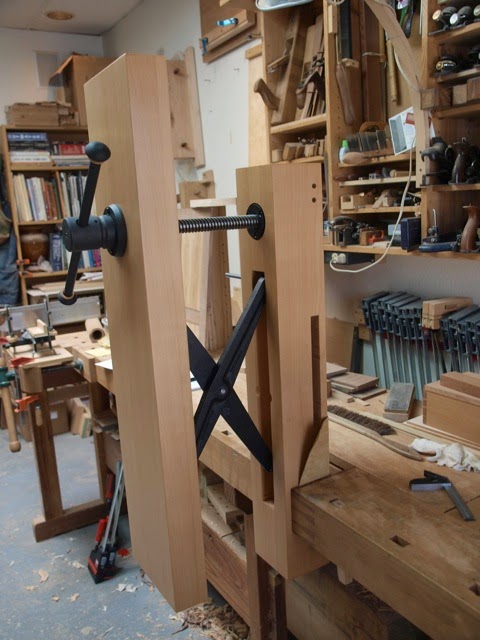
Price is $439 with a Crisscross Solo, and $479 with a Crisscross Retro.


With the added costs of the additional components, we weren't comfortable with the higher price of the Glide M.

The Glide C features a cast-iron handwheel that we're leaving un-machined to save on cost. The wheel has the same weight and feel in use as the machined Glide M wheel. Both vises perform identically. The difference is entirely cosmetic.

The Glide C uses acrylic-infused Beech knobs. The combination of the un-machined wheel and the Beech knobs not only mean a less expensive vise, but also a more traditional look. I have a Glide C on my ash Roubo bench at the moment. I love the look.

In case you're wondering, we do have a Tail Vise C in the works, so you'll be able to completely outfit your bench with matching vises. And yes, the Tail Vise C will also cost less than the current Tail Vise (which will become the Tail Vise M.)

A word on the infused Beech knobs. These are incredibly tough. They are as durable as solid acrylic, but with the feel and look of wood. They won't split or move. If you know the infused mallets made by Dave Jeske of Blue Spruce toolworks, these knobs are the same. In fact, Dave turns all of our vise knobs from the same stuff. They are impeccable in every way.

Price is $369 with a Crisscross Solo ($40 less than the previous "Glide Crisscross"), and $409 with a Crisscross Retro.

Retrofitting your bench with a Glide M or Glide C

The Glide M and Glide C components are not interchangeable with previous versions of the Glide. We've never encouraged upgrading parts of our vises anyway, since that relegates the obsolete parts to the recycle bin. To us it makes more sense to sell your current vise, give it to a friend, donate it to a school, or hang it on your mantle as a piece of industrial art (okay, maybe that's going too far).

If you do upgrade to a Glide M or C, and you currently have a Glide and Crisscross installed in your bench, you'll have to attach the new nut, patch your square acetal bushing mortise and cut a new, round mortise for the round acetal bushing. The existing tapped holes on your chop should work just fine with the Glide M or C.

We'll be uploading the new installation instruction (see our downloads page) for the Glide M/C which also include the Crisscross instructions. We're constantly revising and improving our instructions to make your installs as smooth as possible.

Split Top Roubo Workbench Plans

Its been about two years since we did away with the Split Top Roubo's parallel guide and replaced it with a Crisscross. Unfortunately we haven't had a chance update the STR plans to reflect this.Yes, we've been lax on this and it has caused a bit of confusion. Apologies. We do address the changes in the Glide installation instructions, and the STR Construction notes (both of which have been recently updated to further emphasize the changes.) The bad news is we lost our hard drive that contained the plans as we were updating them, and believe it or not, we also lost two backup drives as well. Computers! The good news is we're back on task and working diligently to get the plans totally updated as soon as possible. They will be better than ever.

See our stuff at WIA in two weeks

We had hoped to return to WIA this year, but the location and timing unfortunately did not work out for us. Maybe next year. However, if you're planning on attending WIA, Plate 11 Bench Company will have one of their benches outfitted with a Glide M, as will the Sterling Tool Works booth. If you're in the market for a finely made bench, Mark Hicks does excellent work and will build you a complete bench, or furnish you with a kit of parts ready to assemble. And Chris Kuehn's Saddle Tail is hands down the best dovetail marker I've ever used. Crisp and precise machining, beautifully made. I have the whole set, including the leather holster.

You can order a Glide M now through our Store page. The Glide C is still in production and will be ready to ship in 3-4 weeks. Watch for an announcement here in the next couple weeks. Tail Vise C's are also still in production and will be ready to purchase, we estimate in a couple months.

Later this fall, Glides will be also available through several of our dealers.