Showing posts with label Crisscross. Show all posts

Friday, June 14, 2019

Now Available: The New Crisscross 14


In the works for a few years now, today we launch our new Crisscross 14.

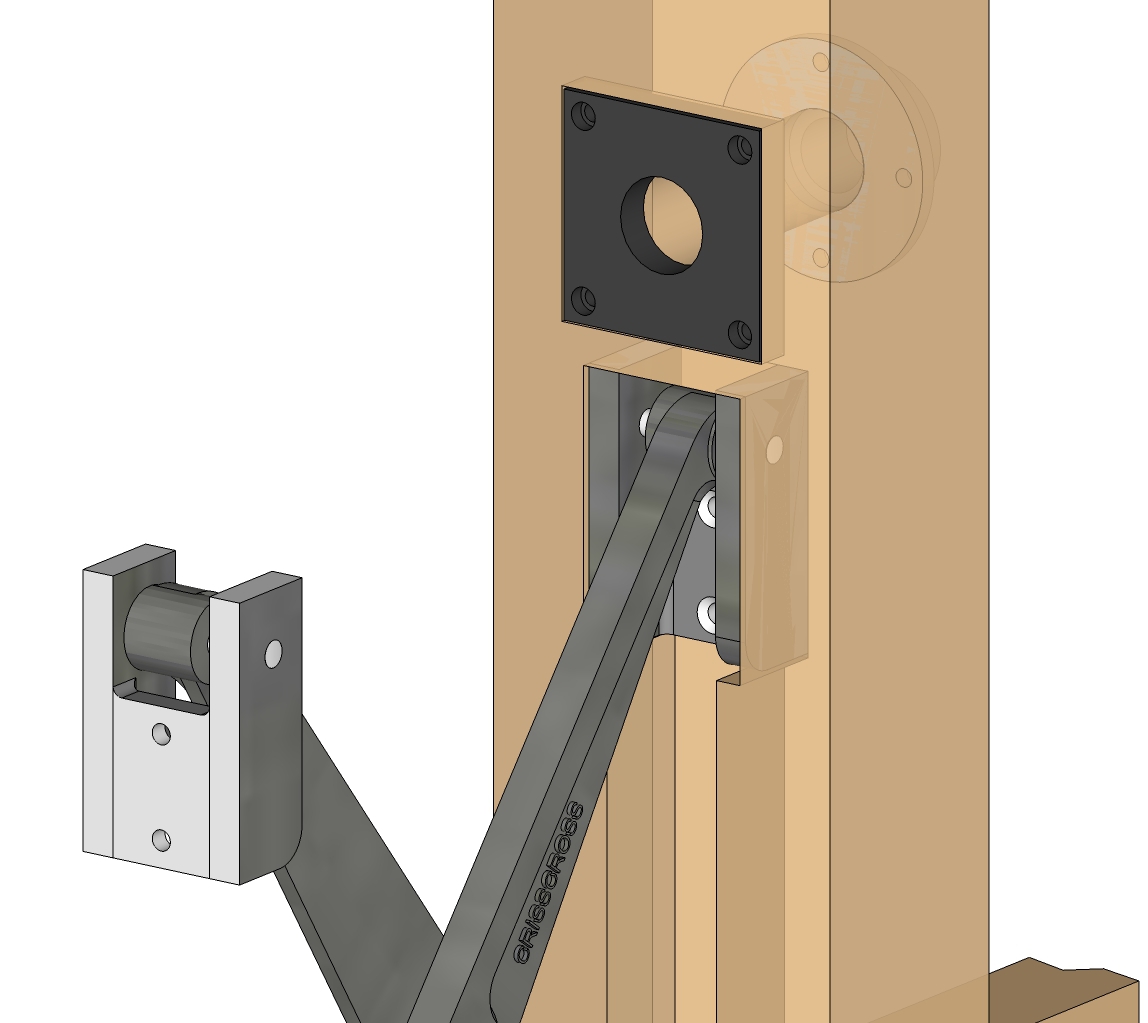
The Crisscross 14 was developed to expand on the versatility of our Crisscross Solo and Retro. With arms that are 14" long, the Crisscross 14 occupies 5" less vertical space than the Solo or Retro and requires only a 7/8"  wide mortise. It functions nearly identically to our full size Crisscross, and mounts to your bench exactly like the Crisscross Solo.

Made entirely from steel and delivered with a lightly oiled finish, the Crisscross 14 was developed to fit in benches that are shorter than 30" tall, leaving more room for positioning your leg vise hardware. It works flawlessly with our Glide or Classic Leg Vise.

The Crisscross 14 is also ideal for use in the Moravian style workbench popularized by Will Myers. It will fit into the bench as designed by Myers without any modification to the plans.

For those wishing to mount a leg vise to an adjustable height workbench (such as a Noden Adjust-a-bench) the Crisscross 14 is a perfect fit, and allows the bench to be lowered as intended.

The Crisscross 14 is $79, and is also available with any of our leg vises and Benchmaker packages.

We're particularly pleased that with the release of the Crisscross 14 we can now offer our Classic Leg Vise with the 14 for only $289.

Order the new Crisscross 14 here. They are in stock and ready to ship.

Monday, March 27, 2017

Crisscross Solo Blems


Just a heads up in case you're in the market for a Crisscross Solo and you're coming to Handworks.
We'll have a few blems available at the event for a discount price of $79. We usually don't have to offer blems or seconds because we usually catch them early on in the process. This time a few Crisscross arms made it all the way through powder coating. Here's the issue with these. During the casting process the moulds get transported from the mould-making area to the pouring deck and every now and then a mould gets jarred and makes the lines in the castings you see above. It's completely cosmetic. The arms function as intended. A few of the arms got the royal treatment at the powder coaters as well. The middle one above shows the result. You may need to run a file or drill bit through the holes to get the pins to pass. These will be priced at $79 and are available only at Handworks. If we have leftovers, we'll post them here for sale after all the hubbub is over.

Tuesday, March 24, 2015

What Is Toe In?


Toe-in can be confusing. Lots of people think their leg vise (or any face vise) should close with perfectly parallel jaws, like a veneer press. And in theory, that would indeed be ideal, but only if your work piece also has perfectly parallel faces. The reality is that its easier and more functional to make a vise with toe-in than with perfectly parallel jaws, with the bonus that toed-in jaws hold less perfect pieces as perfectly well as perfectly parallel pieces. 

Here's why toe-in works. Think of your leg vise as a holdfast, with the moving jaw (chop) being the holdfast itself, and the leg your bench top. You would never place the pad of the holdfast right at the edge of a board, where the holding pressure is only on a very small portion of the board. Rather, you try and place your holdfast near the center of the board, to distribute the clamping pressure over a wide area. If your vise didn't have toe-in, chances are it would grab your workpiece, like the holdfast placed at the edge of the board, below the center of the piece, that is, closer to the bottom edge near the vise screw (where there's less holding power.) Then when you go to plane the edge of your board, it slips and pivots. That's because you're holding the piece at the farthest point (in the vise's weak spot) from where you're stressing the board. This arrangement puts the most stress on the board, making it very easy for the board to shift in the vise. 

Toe-in moves  the holdfast pad (moving jaw) from the edge to the middle of the board, and thus pins the board firmly to the bench top (vise leg.)

The other reason for toe-in is for workpiece stability. If you're working the board into the edge of the bench (dovetailing), and not along the bench (edge planing) you want the piece held at the very top edge of vise opening. If the piece were held lower down in the vise (lack of toe-in) the jaws will be slightly open at the top and your board can vibrate in the jaw during sawing. 

Below is a customer pic of their Glide installation. The top of the bench will fall between the red arrows. The Crisscross is built with toe-in, and because of a number of factors, the toe-in will be slightly variable from bench to bench. But that's the beauty of toe-in. It doesn't need to be precise. As long as there is some toe-in, you're fine. The range is very forgiving. At the bottom of this chop, there's about a 1/2" gap, but once the jaw reaches the top 4" of the vise (the only area that holds your work) the toe becomes subtle. And that's a good thing, since once you tighten the vise down a bit, the jaw flexes slightly and spreads holding pressure over more of your workpiece, with the most pressure right at the top of the jaw--exactly where you want it. 


Wednesday, June 18, 2014

Crisscross Parts Goofs


Due to an oversight at the factory in Shengzen, we've been shipping out the incorrect type of retaining ring that snaps onto the Crisscross' pivot pin. We just discovered it last week.

The correct e-style retaining ring is pictured above, installed on a pivot pin, installed in a Crisscross.

And here is the correct e-style ring on its own:


The incorrect type of retaining ring is pictured below.


This is the ring that has been mistakenly shipped with several Crisscrosses.

Here's the deal. Both rings work just fine with the Crisscross. We use the e-style ring because is presses onto the pin easily without tools, or with a flat blade screwdriver. The other type with two holes requires a special tool to install, or if you're Jeff Miller, a couple toothpicks and some string.

If you have the incorrect rings, and would like a replacement set of e-style rings, drop us a line at info@benchcrafted.com and we'll send you some. If you have the special tool, go ahead and use the wrong style, it won't matter.

Oh, and that bit about Shengzen was a joke. Seriously. Our hardware kits are carefully assembled by a local family-run fasteners supply house. This was a simple typo (our error) that caused the mix up.

The only thing we offer that's made in China is a mean cup of English tea. Earl Gray. Hot.

Monday, March 3, 2014

A Case For The Sliding Leg Vise


We've written before about our general disdain for the sliding leg vise. In short, they offer very little added functionality, besides just plain getting in the way.

But last week customer Julio Alonso sent us pics of his short bench equipped with a sliding leg vise, and we're changing our tune.

Juilo's shop is tiny, and his bench is necessarily short. So it often has to serve double duty. In this case we think a sliding, and more specifically, a removable leg vise makes lots of sense. Need to mount a Moxon vise for dovetailing? No problem. Lift the leg vise off and swap it out with a Moxon.

Here's a short video of Julio's vise.


Thursday, December 12, 2013

XX Small Split Top Roubo


Camil Milincu, a customer from Romania whom we've posted about before, sent us these pictures of a bench he just finished. Camil nailed this one. Here's his description:

Hello Jameel,

I have attached some pictures of a bench I've finished. It's for a friend which had a tough request: all the stuff that's on my bench (seen here -ed.), but in 53 inches. The easiest thing to do was to chop the end vise. But since he might move to a bigger shop (and I hope he does), I had to come up with a plan to keep all the hardware intact.  I've sunk the rails in the underside of the benchtop and made a deep recess for the screw. As I had to keep some wood for the leg tenon, the last dog had to be shortened. This explains the weird hole.
For this one the toothing plane was used only in the center of the slabs, leaving a smooth strip near the dogs.

Let's hope the next one will be a "regular" :).

Best regards and Happy Holidays,
Camil


Thursday, August 29, 2013

Benchcrafted In Bronze


In celebration of our 7th anniversary we're happy to announce our commemorative handwheels, cast in bronze. Why 7th you ask? Well, there is a bronze foundry just up the road from us, and we just couldn't wait another three years. So we dropped off our patterns a few months ago, and told them to let the gold flow. 

We did these purely for fun, so we're more or less pricing the bronze component at our cost, plus a couple tanks of gas to and from the foundry. 

We only have a handful of these (less than 20 of each) and no plans to make more.

Pricing is as follows:  ALL SOLD OUT

     Bronze Glide with Crisscross Solo: $522

     Bronze Glide with Crisscross Retro: $562

     Bronze Tail Vise: $417

     Bronze Benchmaker's Package (Crisscross Solo): $980

     Bronze Benchmaker's Package (Crisscross Retro): $1020

Right now these aren't on our store page. To order, you must send an email to info@benchcrafted.com stating what you'd like, along with your shipping address, and we'll send you an invoice. If you want to purchase other Benchcrafted stuff, make sure you let us know. 


Monday, March 25, 2013

Broken Fingers


Customer Matt O'Neill has recently retrofitted his gorgeous Split Top Roubo with a Crisscross. Take a look at Matt's Broken Fingers Woodworking blog to see more.

Matt has not only has good taste in workholding, but also in vintage machinery. Nice work Matt.

He's also a pretty darn good furnituremaker.


Monday, March 18, 2013

Crisscross Update


We were having some issues with some of the Crisscross arms and brackets picking up some slight surface rust on their way from the foundry. Nobody wants to receive rusty goods, so from here on out we're finishing the Crisscross arms and brackets in a satin black. It doesn't affect installation or function, it's entirely cosmetic. Normally we like to keep everything natural, so customers can have the most options when it comes to finishing their vises, whether it be with baked flax, a bit of paste wax, linseed oil, or nothing. We also personally prefer the look of cast iron in its natural state.

But since the Crisscross parts are mostly hidden once installed, we went ahead with this satin black. It looks completely traditional.


In fact, the satin black parts look much like the natural cast iron. See both in the picture above.

We shipped out the last raw iron Crisscross some weeks ago. If you have a Crisscross currently on order, you'll automatically receive the new satin black parts.

Monday, December 31, 2012

Video: Crisscross Retro Install


On my way out of the Benchcrafted warehouse last Friday, just as I was punching out (right!), I grabbed a Crisscross Retro and headed home. I guess that's one of the advantages of working at Benchcrafted. I can dip into stock anytime, never pay for anything, and walk out feeling like a guilt-free burgler.

In reality, I rarely do this. My bench at home still has the original Benchcrafted Tail Vise in it. The very first one. I still use it almost every day. I did put a new handwheel on it, but that's because we accidentally machined the logo on one small handwheel and one large handwheel upside down. I took those cosmetically-challenged parts and put them to use instead of tossing them back in the furnace. That's why the logo on the handwheel above is upside down. It's also why the handwheels is dark. This is the handwheel I used to demonstrate cold bluing.

You also might notice that I linished the logo in the center of the hub. I did this because it looks nice. It's easy to do with a small sanding block and 120 grit paper. It also looks nice on our standard handwheels, as seen here.

In the video I use a roughing end mill designed for machining aluminum to rout the Crisscross mortise. Spiral upcut router bits are widely available, but I don't much like them. They have a very aggressive cutting geometry, and although they remove material fairly well, this geometry doesn't mingle with tearout-prone woods. It also sacrifices something that I really like when routing: control. The roughing end mill is a three flute, center cutting (so it can be plunged) tool that eats wood like no tomorrow. The serrated flutes break up chips so you can move more rapidly through the cut, and take much more material per pass. The geometry of the tool gives great control. Grain direction is almost non-existent, and you never feel like the router is going to take off on you. The solid carbide bit also features a zirconium coating for durability. The bit does not leave a smooth finish however because of the serrated flutes. The finish is very similar to what a toothing plane or scraper would leave. For the Crisscross mortise its fine. If you'd like to try out this bit, I source it from the same place I get super bit: Carbide Cutting Tools Part # 14740. Carbide Cutting Tools is an old-school machine shop. No online ordering. Pick up the phone and call Frank. He'll be glad to take your order.


A word about the Glide Crisscross, which I now have on my personal bench at home. Saturday I retrofitted the Crisscross to my bench, and the next day (yesterday) I started building a six board chest using the new vise. Although we've been testing the Crisscross in various benches and vises for several months, this is the first project I've actually worked on using a Glide Crisscross in MY bench, working in real time on an actual project. My mind was free to concentrate on the project itself, and not on testing vises. It's been said before by many traditional leg-vise users, "I don't mind the pin". Well, I can now confidently say that not having a pin has changed how I work. Mind you, I enjoy using our vises, but when I'm building furniture, I want all my concentration to go into the creative process. I don't want to think about anything but the wood, and that includes vises, planes, chisels, tools, the heater, whatever. Fussing with things kills my rhythm, as I expect it does others. The Glide Crisscross is the best thing that has happened to my Roubo bench,

I tried to cover just about everything in the following video. If you have any questions, please post them below.


Thursday, December 27, 2012

Crisscross Video


Here's a short video we shot a few weeks ago showing the Crisscross in action. Once again, the Crisscross works with any leg vise hardware, not just ours, although its particularly sweet with a Glide.

Hopefully this weekend I'll finally get to retrofit my personal bench with a Crisscross. I'll try to take some pics and video to further illustrate the process.


Thursday, December 13, 2012

Glide Crisscross Acetal Bushing--Modification


If you are retrofitting a Glide leg vise with a Crisscross, you may need the latest version of our acetal bushing.

We began shipping ALL Glide leg vises with this new bushing some months ago. If you have a Glide from about mid-summer 2012, you should already have the new bushing. You're good to go if retrofitting a Crisscross.

But for those of you with older Glides (before summer 2012) you will have the original acetal bushing.

Here's how to tell the difference:


This is an original acetal bushing. The central hole is a true circle, just a few thousandths larger than the vise's acme screw.


This is the new, current version of the acetal bushing. We've kept the hole the same width as the original, but enlarged the height of the hole equally above and below the screw. When designing the Crisscross Glide we found that a bit of extra clearance above and below the screw allowed the vise to work more smoothly. You should realize that we always shoot for "ultimate" smoothness with our vises. With the new version bushing installed the Glide Crisscross works even smoother than the original Glide. We can give the handwheel a hearty spin and it will keep going for up to 15 revolutions. This is a neat parlor trick, but its also a good barometer for what's possible when you get your Glide Crisscross installed to its potential. We have customers who have experienced the same.

If you have an original acetal bushing and would like to modify it like the new version, its easy. Here's how:


Take your original bushing and remove material from the upper and lower half of the hole (the areas in red). Do not remove any material from the width of the hole, keeping about 5/16" in the middle area untouched. This middle area is all that's necessary to stabilize the screw. The areas where you remove material should never touch the screw, once installed. The ideal tool for this job is a spindle sander. You can also use a rat tail rasp or file, or sandpaper wrapped around a dowel. Acetal works easily.

This is the quickest and cheapest way to get yourself the new bushing. We will sell you a new bushing if you like (even though we think it'd be silly), they are $20 including shipping. But right now all our bushing inventory is earmarked for Glides, so your best bet would be to modify.

Tuesday, December 4, 2012

Crisscross Instructions Now Available


You can now download the complete installation instructions and measured drawings for the Benchcrafted Crisscross.

As always, instructions for all our vises are available free, anytime, on our downloads page.

The instructions include detailed, step by step instructions for fitting a Crisscross Solo or Retro to new benches (where you can work on the leg on its own) or for retrofitting where the leg may be permanently joined to the rest of the bench. We also include comprehensive measured drawings for the necessary mortise and hole locations.

If you're installing a Glide Crisscross we've included a special section within the Crisscross instructions, since the majority of the Glide Crisscross install is in the Crisscross itself. Glides with the Crisscross should install much faster than the original Glide with its parallel guide, leg mortise, and roller brackets.

The instructions also include information on how to install the Crisscross in our Split Top Roubo, including measured drawings of the front rail joinery, which is different with the Crisscross. 


Monday, December 3, 2012

Crisscrosses Shipping, Bench Classes


Last week we began shipping Crisscrosses to customers. I'm proud to say that we were a couple days early this time!

One of the first persons to order a Crisscross was Jeff Miller. It was at Jeff's shop during a Lie-Nielsen Hand Tool Event that we first announced the new Crisscross and Jeff was quick on the draw when we opened ordering a few weeks ago. Jeff received his two Crisscrosses on Friday and installed them over the weekend in two benches he had ready and waiting. He says they are running sweetly.

We've been receiving numerous emails lately about whether we're going to be offering a bench class somewhere next year. Right now the answer is maybe. I can't be specific, but we're trying to arrange something very unique. It definitely won't be for everyone, and it may not even happen. It's too early to say for sure. This is all the info I have at the moment.

If you are looking to build a Roubo bench in 2013, Jeff Miller is once again offering two classes to build the bench that is on the cover of the current issue of Fine Woodworking's Tools and Shops issue. We can't recommend a better place to build a bench in 2013. Jeff has perhaps installed more of our vises than anyone except us. So you can be assured of a great experience and a great bench.


As promised, we also built a leg vise last week using a wood screw and a Crisscross Retro. And it works great. We don't make wood screws, but there is a certain appeal to wood screws on a traditional bench. And now with the addition of the Crisscross, they are simply awesome. Here's why. Wood screws are fast, but like any vise (metal or wood) they also have mass, so any gravitational pull is going to slow them down, and make them feel not so nice. The Crisscross counters gravity by floating the chop and screw, so all you feel when you turn the handle is the screw in the nut-- no downward force at all. Much like a leg vise with roller brackets (like our Glide), only better since you don't have to move the pin. So you get the speed and charm of wood, without the choppy gravitationally-challenged action you typically see. We love it. Incidentally, we used an ash screw from Big Wood Vise for this apparatus (we turned our own handle.)

We didn't have a dedicated bench to put this in, so we built a high leg vise that clamps to any bench. These taller leg vises are great for detail work. You can get the work right up next to your chest and get great control. I've had a similar version in the shop for a few months now and I find myself heading for it quite regularly. If you want to build one like it, we recommend using a wood screw with the Crisscross, since the vise will be lighter and easier to store. You can of course use a Glide, but for an accessory vise its going to be heavy, and a tad pricey for occasional use. Go with a wood screw.

Follow the Crisscross installation instructions, which we'll have up on our downloads page in a day or two.


Thursday, November 29, 2012

Crisscross Update


This week at Benchcrafted we're busy doing two things. Finishing up the new version of our Split Top Roubo, and packing Crisscrosses.

Next week we begin shipping Crisscrosses, and we couldn't be more excited. It's been about seven months since we announced our version of the St. Peter's Cross, and many years of wondering and speculating about the mechanism.

In the next couple weeks we'll be updating the website with a new Crisscross page, as well as our new, updated Split Top Roubo bench.

What's new about the Split Top Roubo? Not much. We basically needed a current version with all our latest vises installed (and new end cap barrel nuts) to photograph for the website. We'll be tweaking a couple minor issues with the plans (and eventually adding drawings for the Glide Crisscross within the plans) and shooting some video of the bench, something we didn't do when we released the first Split Top Roubo four years ago.

This bench was built in rock maple with all of our latest vises (with new handwheels), including one of the production models of the Crisscross with our Glide leg vise. Although there is a price difference versus the original Glide ($40), the Crisscross upgrade is completely worth it. As soon as I can snatch some free time, I'm going to retrofit my personal bench with a Crisscross.

We'll also be posting complete Crisscross installation instructions shortly.


Wednesday, October 31, 2012

WIA Cincinnati 2012


This is a post we've struggled to write. For the first time since its inception in 2008, Benchcrafted won't be at WIA this year. We've traveled all over the country to attend this event, but this year the WIA schedule simply proved to be too difficult to fit in for us. We're going to miss visiting with old and new customers alike, and spending time (always too limited) with our fellow hand-tool enthusiasts, which always proves to be enormously motivational and inspirational. Coming home from WIA always has me personally itching to make furniture and new Benchcrafted products.

The upside to us not attending is this. We're focusing on keeping vises in stock, and getting our newer products on the shelf quicker and more efficiently.

We won't be entirely absent from WIA however. Our good friend Raney Nelson of Daed Toolworks asked us a few weeks ago if we had an extra demo bench we could spare for the show. Well, of course we did, since we won't be there. The bench we sent for the Daed Toolworks booth features our new handwheels on both the tail vise and Glide leg vise, as well as a production prototype of the new Crisscross. If you stop by DTW's booth, do yourself a favor (and be cordial to Raney) and try out his hand-made infill planes before bombarding him with questions about our stuff (he uses Benchcrafted vises in his furniture shop too) That's Raney in the picture at the top.

I've also heard through the grapevine (read, Jeff Miller) that Andy Brownell will be bringing his Split Top Roubo (with our vises) to demo in the Gorilla Glue booth. If you glance over at the big Gorilla Glue sign and think "eh, its just glue" you're doing yourself a disservice. Andy always brings a project to the show (and Andy builds NICE furniture) and works on it in real time for the entire weekend. I'm guessing he'll also have his traveling Anarchist's tool chest along as well. I've seen it. It's gorgeous.


Friday, September 28, 2012

Crisscrosss Pricing

As promised, below is pricing on the forthcoming Benchcrafted Crisscross.

We'll be offering the Crisscross in two separate configurations depending on the installation method. Either version will work with any leg vise.You don't need a Benchcrafted Glide to use the Crisscross. 

Crisscross


Crisscross Solo  $99 (pictured above)


The upper ends of the Crisscross arms pivot on two 3/8" steel rods. In order for the Crisscross to function properly, these two rods must be parallel with each other, and perpendicular to the two arms. If you're building a new bench (or a stand-alone vise) where you can drill accurately for these pivot rods using a drill press, the Crisscross Solo will suit your needs. All necessary hardware is included to install the Crisscross Solo with a leg vise of your choice. This version will take less time to install than the Retrofit (see below). However, the Crisscross Solo is less forgiving to install. You need to be accurate about your pivot rod locations and get them straight through the leg and chop. If you make a mistake, you'll have to relocate the pivot rods. We'll cover this in detail in the forthcoming installation instructions.


Crisscross Retro $139 (pictured above)

If you'll be retrofitting a Crisscross to an existing bench, where it would be difficult to drill deep, straight holes for these pivot rods through thick wood by hand (since it will likely be impossible to drill an assembled bench leg using a drill press) the Crisscross Retro will be the better choice. The Retro includes two machined cast iron brackets that automatically provide accurately positioned pivot rod holes. All you have to do it excavate a slightly wider section of the mortise in your leg and chop, and simply screw the brackets in place. No deep drilling required. You may choose to use the Retro version even in new construction, in order to simplify the process and help achieve accurate pivot pins.

Glide Leg Vise w/ Crisscross

We're also offering a special price when you purchase a Glide Leg Vise along with a Crisscross. (These packages DO NOT include roller bracket hardware, which are not needed with the Crisscross)

Glide Crisscross Solo: $399

A Benchcrafted Glide Leg Vise with a Crisscross Solo. Everything you need to build a Glide Leg Vise with a Crisscross, except for wood.


Glide Crisscross Retro: $439

A Benchcrafted Glide Leg Vise with a Crisscross Retro. Everything you need to build a Glide Leg Vise with a Crisscross, except for wood. This includes the two machined brackets.

Benchmaker Packages 

Split Top Roubo and Shaker Benchmaker's packages will also be available with the Glide Crisscross.

Split Top Roubo Benchmaker's Package w/ Glide Crisscross Solo: $809

Split Top Roubo Benchmaker's Package w/ Glide Crisscross Retro: $849

Shaker Benchmaker's Package w/ Glide Crisscross Solo: $829

Shaker Benchmaker's Package w/ Glide Crisscross Retro: $869

Pre Ordering 

Crisscrosses, Glide Crisscrosses, and Benchmaker's Packages with Crisscross are available for pre-ordering now on our Store page

Special discount for past Glide customers

For customers who purchased a Glide leg vise between February 1st, 2012 and  September 1st, 2012, we will offer free domestic shipping (a $16.00 average value) on both Crisscross Solo and Crisscross Retro. This, of course, does not apply to other purchases. It's for the Crisscross Solo or Retro only. For international Glide owners, we'll give a prorated discount. Inquire for rates.

To get free shipping, simply order a Crisscross, then include a note with your order stating that you bought a Glide between those dates.


Lead times

Ship date for the first run of Crisscrosses is December 3. If we complete the run early, we'll ship before then. Depending on demand, we may sell out quickly. Order now to increase your chances of getting your Crisscross soon. 
More info

To view everything we've published about the Crisscross, follow this link. This includes installation details, dimensions, demo videos. Everything. In the coming weeks we'll update the website with a Crisscross page and installation instructions.


Thursday, September 20, 2012

Crisscross Installation - A Preview


For the past week we've been putting in long days packing vises. Yes, we're happy to say that we're shipping vises again. If you've ordered in the past two months (ouch!) your vises may have already gone out, or you'll be hearing from us very soon about shipping details. So keep your eyes peeled for notifications in your inbox. By this time next week, all open orders should be filled.

Now, for those of you who are looking to install a Crisscross we have some good news. We've been preparing some drawings for you. We don't normally recommend that you cut into your bench before the hardware is in hand. But in this case you can feel fairly safe in doing so. The mortise for the Crisscross is fairly straigh forward. It'd be pretty hard to goof up. If you're not 100% confident though, better wait. Study the drawings and instructions carefully and lay out everything in actual size on your bench parts before cutting anything. A couple weeks ago we prepped nine benches for Crisscrosses, so we've got virtually all the install bugs worked out. If you have any questions or concerns, post them as comments below so all can benefit.

The best way to excavate the long Crisscross mortises is on a drill press with a large Forstner bit. This will hog out tons of material in short order. Then clean up the little crescent shapes with a router and fence, or simply with a paring chisel.

You can also do your base joinery based on the drawings in the PDF.

If you have a Glide in hand (or other leg vise hardware like a simple bench screw) do not install it yet. There is an installation sequence to be followed to allow the Crisscross and Glide (or bench screw) to work best with each other. We'll cover that in more detail when the Crisscross instructions are finalized.

Now I'm sure you're wondering when the Crisscross will be available, and how much it will cost. We're very close to having pricing finalized. Should be within a week. As for production date, probably sometime in November. Definitely well before Christmas.

Here is the link to download the PDF:

Crisscross Installation Preview


Thursday, August 30, 2012

Crisscross Update - Video


Hard to believe it will be September in a day. It seems like we just got back from the Lie-Nielsen Hand Tool Event at Jeff Miller's where we first showed the new Benchcrafted Crisscross. That was back in April.

Between our new handwheels and the Crisscross we're just about ready for a week off. But nope, we're trudging forward to get the Crisscross in production as soon as we can.

This past week showed some great progress. First off, we picked up a small batch of the first castings of the Crisscross arms and the brackets that attach the arms to your bench. And over the past weekend we machined up the first pre-production samples to test out the castings and our machining process.


We still have few small details to work out, but our pre-production unit is singing. If you've been following along, you know that the prototype was quite large. The production model is 6" shorter, and actually works better than the prototype as a result. The Crisscross can be used in benches as short as 30" (even shorter if you mount the screw a bit higher in the leg.) The jaws will open to about 9". Way more than you'll ever need. The cool part is that the chop glides in and out no matter how open the jaws. And coupled with our Glide Leg Vise, the thing is just a ton of fun to operate, and not to mention, effective. The vise holds wood like, well, like crazy. Compared to a standard leg vise with a parallel guide and pin, the Crisscross gives a little more ease when approaching the final grip. You have more feedback. With a pin its more abrupt and crisp, especially with a thick chop. Feel-wise, one isn't better, its just different. My own personal opinion is another thing. I'll be retrofitting my bench with a Crisscross as soon as I can. I never minded moving the pin, but did I enjoy it? Well.....


If you don't have a Glide, can't afford one, or just don't like handwheels (what's wrong with you?), the Crisscross works like the traditional leg vise of your dreams when paired with a plain-jane bench screw, metal or wood. Well, we haven't tried one with wood yet, but it will work fine. We'll get one mounted up with a wood screw and report back.

The vise in the pics and video was built with a rather long "leg" portion. This was done to operate the vise at a convenient height, and also so the screw would not interfere with the bench the vise is temporarily mounted to. The length of the chop here is 33", so pretty typical for a standard bench. There is over 8" between the screw and the top of the chop (in other words the top of the bench.) You will see some lateral motion in the chop as the vise is operated. This is completely intentional and built into the vise during the machining process. A vise needs a certain amount of give in specific areas, just like a fine suit.

We should have pricing by the end of the month (September, not tomorrow!) and hopefully a release date as well.

Here's a short video.

Friday, August 17, 2012

Lead Time Updates


Boy do we feel like this guy lately.

We know lots of you are itching to get your vises. And we are itching, no clawing to get them to you. We've been wrapping lots of stuff lately (rails, flanges, sliding plates, roast beef sandwiches--hey! we gotta eat!) and now we're into machining handwheels, by far the most time-consuming aspect of our vise manufacturing. Since releasing our new handwheels we've been swamped with orders. For those of you who ordered the new vises, we're approaching the 6 week lead time here in a week or so. I'm not going to be overly optimistic here, and we owe it to you to be completely honest. We're probably going to blow past that mark.  But not by much.

But here's the silver lining. We're lagging because we're making lots of vises. So once this current run is finished we should be sitting pretty, unless Oprah decides she's getting into the whole Roubo bench craze. I've played out the same exchange over and over in my mind "what's your lead time?.....none! we actually have vises in stock for a change!" That will happen. I can feel it. So, bear with us for a bit more. It'll be worth it.

Crisscross

The Crisscross has been poured. And next week we'll pour the castings for the brackets that make the Crisscross easy to install. Then both parts get some time in the Bridgeport mill to make them fit for the Benchcrafted label. Wait a sec, the Crisscross is cast with our name already on it. So there it is, its guaranteed. The Crisscross is going to be awesome!

Carver's Vise

Progress on the Benchcrafted Carver's Vise is moving along. This week we finished off a couple of the smaller parts. For this first run, we'll be making only 100 vises. This is one product that we don't plan to stock or have a lead time on. They will be batch made and available on a first-come, first-served basis only.

Have a nice weekend.