BLOG

Monday, December 31, 2012

Crisscross customers - feedback please


We've been shipping out Crisscross orders for a few weeks now.  As many of you know by now, for most of those orders, we've opted to ship via USPS Flat Rate.  This accomplishes a few things; obviously a flat rate which tends to be considerably cheaper than variable UPS rates, quicker shipping since there is no calculation on our part which in turn takes time and typically fast delivery times (USPS Priority is usually a day or more faster than ground UPS and includes Saturdays).

What we'd like to know from our customers is how those shipments are faring.  We're guessing that it's going well since we've had no real comments or emails on the subject.  Our only real concern is the condition of these packages when they arrive.  The Flat Rate boxes are nice, but not terribly robust.  That said, we pack them well and we typically do some additional taping to beef them up a bit.  Furthermore, the Crisscross itself is packed in a good quality box within the shipping box.  Finally, it's not exactly petit fours we're shipping here, cast iron tends to be pretty tough!

A short comment left below would be appreciated.  Again, we can only assume that these are working out pretty well.  One thing we don't need to verify, we know our customers appreciate cheaper shipping!


Video: Crisscross Retro Install


On my way out of the Benchcrafted warehouse last Friday, just as I was punching out (right!), I grabbed a Crisscross Retro and headed home. I guess that's one of the advantages of working at Benchcrafted. I can dip into stock anytime, never pay for anything, and walk out feeling like a guilt-free burgler.

In reality, I rarely do this. My bench at home still has the original Benchcrafted Tail Vise in it. The very first one. I still use it almost every day. I did put a new handwheel on it, but that's because we accidentally machined the logo on one small handwheel and one large handwheel upside down. I took those cosmetically-challenged parts and put them to use instead of tossing them back in the furnace. That's why the logo on the handwheel above is upside down. It's also why the handwheels is dark. This is the handwheel I used to demonstrate cold bluing.

You also might notice that I linished the logo in the center of the hub. I did this because it looks nice. It's easy to do with a small sanding block and 120 grit paper. It also looks nice on our standard handwheels, as seen here.

In the video I use a roughing end mill designed for machining aluminum to rout the Crisscross mortise. Spiral upcut router bits are widely available, but I don't much like them. They have a very aggressive cutting geometry, and although they remove material fairly well, this geometry doesn't mingle with tearout-prone woods. It also sacrifices something that I really like when routing: control. The roughing end mill is a three flute, center cutting (so it can be plunged) tool that eats wood like no tomorrow. The serrated flutes break up chips so you can move more rapidly through the cut, and take much more material per pass. The geometry of the tool gives great control. Grain direction is almost non-existent, and you never feel like the router is going to take off on you. The solid carbide bit also features a zirconium coating for durability. The bit does not leave a smooth finish however because of the serrated flutes. The finish is very similar to what a toothing plane or scraper would leave. For the Crisscross mortise its fine. If you'd like to try out this bit, I source it from the same place I get super bit: Carbide Cutting Tools Part # 14740. Carbide Cutting Tools is an old-school machine shop. No online ordering. Pick up the phone and call Frank. He'll be glad to take your order.


A word about the Glide Crisscross, which I now have on my personal bench at home. Saturday I retrofitted the Crisscross to my bench, and the next day (yesterday) I started building a six board chest using the new vise. Although we've been testing the Crisscross in various benches and vises for several months, this is the first project I've actually worked on using a Glide Crisscross in MY bench, working in real time on an actual project. My mind was free to concentrate on the project itself, and not on testing vises. It's been said before by many traditional leg-vise users, "I don't mind the pin". Well, I can now confidently say that not having a pin has changed how I work. Mind you, I enjoy using our vises, but when I'm building furniture, I want all my concentration to go into the creative process. I don't want to think about anything but the wood, and that includes vises, planes, chisels, tools, the heater, whatever. Fussing with things kills my rhythm, as I expect it does others. The Glide Crisscross is the best thing that has happened to my Roubo bench,

I tried to cover just about everything in the following video. If you have any questions, please post them below.


Thursday, December 27, 2012

Crisscross Video


Here's a short video we shot a few weeks ago showing the Crisscross in action. Once again, the Crisscross works with any leg vise hardware, not just ours, although its particularly sweet with a Glide.

Hopefully this weekend I'll finally get to retrofit my personal bench with a Crisscross. I'll try to take some pics and video to further illustrate the process.


Thursday, December 13, 2012

Glide Crisscross Acetal Bushing--Modification


If you are retrofitting a Glide leg vise with a Crisscross, you may need the latest version of our acetal bushing.

We began shipping ALL Glide leg vises with this new bushing some months ago. If you have a Glide from about mid-summer 2012, you should already have the new bushing. You're good to go if retrofitting a Crisscross.

But for those of you with older Glides (before summer 2012) you will have the original acetal bushing.

Here's how to tell the difference:


This is an original acetal bushing. The central hole is a true circle, just a few thousandths larger than the vise's acme screw.


This is the new, current version of the acetal bushing. We've kept the hole the same width as the original, but enlarged the height of the hole equally above and below the screw. When designing the Crisscross Glide we found that a bit of extra clearance above and below the screw allowed the vise to work more smoothly. You should realize that we always shoot for "ultimate" smoothness with our vises. With the new version bushing installed the Glide Crisscross works even smoother than the original Glide. We can give the handwheel a hearty spin and it will keep going for up to 15 revolutions. This is a neat parlor trick, but its also a good barometer for what's possible when you get your Glide Crisscross installed to its potential. We have customers who have experienced the same.

If you have an original acetal bushing and would like to modify it like the new version, its easy. Here's how:


Take your original bushing and remove material from the upper and lower half of the hole (the areas in red). Do not remove any material from the width of the hole, keeping about 5/16" in the middle area untouched. This middle area is all that's necessary to stabilize the screw. The areas where you remove material should never touch the screw, once installed. The ideal tool for this job is a spindle sander. You can also use a rat tail rasp or file, or sandpaper wrapped around a dowel. Acetal works easily.

This is the quickest and cheapest way to get yourself the new bushing. We will sell you a new bushing if you like (even though we think it'd be silly), they are $20 including shipping. But right now all our bushing inventory is earmarked for Glides, so your best bet would be to modify.

Wednesday, December 12, 2012

Update to the website


Well it's taken too long but we should have an updated version of the website up and running before noon CST today.

Make sure you refresh your pages, especially if you don't have your browser set to automatically do so.

Highlights? We've actually added a Crisscross page (shocker!), made some pretty big changes to a few of the other pages and redone some of the navigation.  After several requests we've also added Gift Certificates to the order page (all the way at the bottom.

Monday, December 10, 2012

Shaker Benchmaker's Package Hardware Kit


We're making a change to our Shaker Benchmaker's Package. We will no longer offer the complete package. This means if you wish to build the Benchcrafted Shaker Bench, you'll need to purchase three items separately: Glide Leg Vise, Tail Vise, and Shaker Plans. It's the hardware kit that we're in fact discontinuing. We have a fair amount of customers who end up using different hardware, or configure their bases differently such that the included hinges and fasteners don't always work. So to send out these kits is rather wasteful, and frankly, silly. You should assemble your hardware kit for the configuration you choose.

Our Shaker Plans are of course still available. We will be updating the construction notes (available for free anytime from our downloads page) with a complete list of the hardware needed to build the bench exactly from the plans, and where to get it. Then anyone making changes can go from there and source their own particular kit from these sellers. In the meantime, here's a list with links of everything in the hardware kit:

Shaker Benchmaker's Hardware Kit:

3" H-hinge (four pair req.)
These are the hinges to hang the four front doors. We use Acorn brand hinges. A good source for these is Historic Housefitters. Item #433-3.


4" H-hinge (one pair req.)
These are the two hinges to hang the leg vise access door. We use Acorn brand hinges. A good source for these is Historic Housefitters. Item #434-3.

Another source for H hinges is Horton Brasses. They have excellent quality brass hinges, as well as hand-forged. More expensive than the machine-made Acorn brand hinges, but exquisite quality.

1/2" X 6" Lag Screw (five req.)
Used to attach the end cap to the benchtop.

We use Spax brand, which are widely available. They are properly heat treated and have deep, crisp threads. You can use hardware or big-box store lags, but they are low quality, soft, with blunt, shallow threads. You can get Spax lags individually at Menards stores (upper midwest) better contractor supply houses, Fastenal, and online at places like McFeely's. 
Square head, black oxide lag bolts would also look nice here. Available from Blacksmith Bolt.

5/16" X 3 1/2" Lag Screw (six req.)
Used to attach the benchtop to the cabinet base (four), and for the roller bracket mounting block (two). The latter two are not required if you're using a Glide Crisscross.
Sources,  see above 

5/16" X 4" flat head cap screws (five req.)
These machine screws are used to attach the deadman rail to the front of the cabinet. Available from industrial supply houses like Grainger and Fastenal (both found in all major cities) and well-stocked hardware stores such as Ace. Also available from Bolt Depot. You can also use different fasteners for this application, like lag bolts. Square head, black oxide lag bolts would look nice here. Available from Blacksmith Bolt.

Tuesday, December 4, 2012

Crisscross Instructions Now Available


You can now download the complete installation instructions and measured drawings for the Benchcrafted Crisscross.

As always, instructions for all our vises are available free, anytime, on our downloads page.

The instructions include detailed, step by step instructions for fitting a Crisscross Solo or Retro to new benches (where you can work on the leg on its own) or for retrofitting where the leg may be permanently joined to the rest of the bench. We also include comprehensive measured drawings for the necessary mortise and hole locations.

If you're installing a Glide Crisscross we've included a special section within the Crisscross instructions, since the majority of the Glide Crisscross install is in the Crisscross itself. Glides with the Crisscross should install much faster than the original Glide with its parallel guide, leg mortise, and roller brackets.

The instructions also include information on how to install the Crisscross in our Split Top Roubo, including measured drawings of the front rail joinery, which is different with the Crisscross. 


Camil's Roubo


 A year ago we shared Camil Milincu's Moxon build. This time around it's Camil's Roubo in Beech with twin tail vises.

Have a look at Camil's build gallery for all the details. We especially like Camil's nameplate. How did you do that Camil? Awesome work!

"Thanks again for the hardware, support and the "nudge" to evolve. I'm sure that if it was not for your bench hardware, I would have missed all this experience. Best regards, Camil"


Monday, December 3, 2012

Crisscrosses Shipping, Bench Classes


Last week we began shipping Crisscrosses to customers. I'm proud to say that we were a couple days early this time!

One of the first persons to order a Crisscross was Jeff Miller. It was at Jeff's shop during a Lie-Nielsen Hand Tool Event that we first announced the new Crisscross and Jeff was quick on the draw when we opened ordering a few weeks ago. Jeff received his two Crisscrosses on Friday and installed them over the weekend in two benches he had ready and waiting. He says they are running sweetly.

We've been receiving numerous emails lately about whether we're going to be offering a bench class somewhere next year. Right now the answer is maybe. I can't be specific, but we're trying to arrange something very unique. It definitely won't be for everyone, and it may not even happen. It's too early to say for sure. This is all the info I have at the moment.

If you are looking to build a Roubo bench in 2013, Jeff Miller is once again offering two classes to build the bench that is on the cover of the current issue of Fine Woodworking's Tools and Shops issue. We can't recommend a better place to build a bench in 2013. Jeff has perhaps installed more of our vises than anyone except us. So you can be assured of a great experience and a great bench.


As promised, we also built a leg vise last week using a wood screw and a Crisscross Retro. And it works great. We don't make wood screws, but there is a certain appeal to wood screws on a traditional bench. And now with the addition of the Crisscross, they are simply awesome. Here's why. Wood screws are fast, but like any vise (metal or wood) they also have mass, so any gravitational pull is going to slow them down, and make them feel not so nice. The Crisscross counters gravity by floating the chop and screw, so all you feel when you turn the handle is the screw in the nut-- no downward force at all. Much like a leg vise with roller brackets (like our Glide), only better since you don't have to move the pin. So you get the speed and charm of wood, without the choppy gravitationally-challenged action you typically see. We love it. Incidentally, we used an ash screw from Big Wood Vise for this apparatus (we turned our own handle.)

We didn't have a dedicated bench to put this in, so we built a high leg vise that clamps to any bench. These taller leg vises are great for detail work. You can get the work right up next to your chest and get great control. I've had a similar version in the shop for a few months now and I find myself heading for it quite regularly. If you want to build one like it, we recommend using a wood screw with the Crisscross, since the vise will be lighter and easier to store. You can of course use a Glide, but for an accessory vise its going to be heavy, and a tad pricey for occasional use. Go with a wood screw.

Follow the Crisscross installation instructions, which we'll have up on our downloads page in a day or two.


Sunday, December 2, 2012

French Oak


Late 1700's. The Palace of Versailles. Trees are planted. Roubo and Jefferson walk the grounds, and perhaps exchange a few words with the gardeners.

2000. A huge windstorm throttles France, trees are uprooted, sawed, and set aside to dry.

2012. The wood arrives in America, and (perhaps fatefully) falls into the hands of Roubo enthusiasts.


Thursday, November 29, 2012

Crisscross Update


This week at Benchcrafted we're busy doing two things. Finishing up the new version of our Split Top Roubo, and packing Crisscrosses.

Next week we begin shipping Crisscrosses, and we couldn't be more excited. It's been about seven months since we announced our version of the St. Peter's Cross, and many years of wondering and speculating about the mechanism.

In the next couple weeks we'll be updating the website with a new Crisscross page, as well as our new, updated Split Top Roubo bench.

What's new about the Split Top Roubo? Not much. We basically needed a current version with all our latest vises installed (and new end cap barrel nuts) to photograph for the website. We'll be tweaking a couple minor issues with the plans (and eventually adding drawings for the Glide Crisscross within the plans) and shooting some video of the bench, something we didn't do when we released the first Split Top Roubo four years ago.

This bench was built in rock maple with all of our latest vises (with new handwheels), including one of the production models of the Crisscross with our Glide leg vise. Although there is a price difference versus the original Glide ($40), the Crisscross upgrade is completely worth it. As soon as I can snatch some free time, I'm going to retrofit my personal bench with a Crisscross.

We'll also be posting complete Crisscross installation instructions shortly.


Friday, November 23, 2012

HANDS: not to be missed

Observant readers will note that this is indeed a re-post from last year.  We'd like to reiterate however that our ultimate goal is not profit but the proliferation of this series.  We simply feel that there are few in any hand work oriented endeavor who wouldn't greatly enjoy this series and support the maker's in doing so.

BLACK FRIDAY: We now have the the entire set on sale for $169.00!


While hand tools and hand work in general have taken an enormous back seat since the Industrial Revolution, there has and probably always will be a strong and dedicated cadre of craftsmen and artisans that will exist both out of necessity and desire, mostly out of necessity.  Hopefully more out of necessity, because while desire, fervor and zeal can be good things, nothing produces results like necessity, the mother of invention.  While we've not always been tool makers, we are deeply steeped in this spirit of necessity.  

It's a shame that so many things are lost.  A lot of what we lose is because of youth.  As we age we gain an appreciation for the mundane, which in turn turns to an appreciation for simpler things.  Mundanity is under appreciated.  It's also eschewed by the young.  They don't know theyr'e doing it, much as we didn't or don't, but it's being done all the same.  The funny thing is that a lot of the world lives day to day in the mundane, perfectly happy, because they aren't wrapped up in distraction.  In fact most of the world doesn't have the luxury of distraction.  Necessity again.

In the light of what is lost, going to be lost or maybe can be saved, we are very happy to announce the addition of this set of videos to our website.  As many of you know, we don't typically sell anything we don't produce, but these were too hard to ignore.   We simply cannot overemphasize the importance of these videos.  I only wish there were more.  The videos are perfectly produced with very little embellishment, even the narration is reserved and well placed, not distracting.  Anyone who has even a passing interest in hand crafts, will not be disappointed in this treasure.

Take 10 minutes and watch the preview video we've put together.  These simple videos are enthralling, so much so that they were requested in our household by our 6 & 8 year olds every evening until we had watched all 37 videos!  The real mastery of these videos is that they are presented so well that they make some subjects that we're not typically as interested in just as enticing as those we are.  We found ourselves enthralled as much or more by the silk, book binding and pottery segments,  as we did by the woodworking segments..........if not more so! 

David and Sally Shaw-Smith made HANDS, a unique, multi-award winning series of thirty-seven documentaries on Irish crafts for Irish television (RTÉ, Raidió Teilifís Éireann [Radio && Television of Ireland]). Capturing the final years of traditional rural and urban life in Ireland, during the seventies and eighties. They travelled the length and breadth of the country recording these personal and revealing films. As much about the life of the individuals, as the crafts they practised.

We're offering this unique set at a special price until December 25th, after that it's goes back to it's normal price.  See more details here.

Thursday, November 22, 2012

Black Friday

We will have something.......tomorrow!

Friday, November 16, 2012

A Treat For Tool Nuts


For several years we offered Gramercy Holdfasts as part of our Benchmaker's Package. Although we don't offer them anymore as part of that package, we are still huge fans of them. And suffice it to say we're still huge fans (and customers) of Tools For Working Wood in Brooklyn, NY.

Joel, Tim, Ben, Chrystal (I'm sure I'm forgetting someone) have put together a simply wonderful gift for not only us die-hard handtool woodworkers, but also for us tool junkies as well.

Take a look at the what the good folks at TFWW have put together. They call it "Modern Edge Tools"

For fans of the old Popular Mechanics magazines of the 1950's, this will be right up your alley. I'm a child of the 70's, but this was a real fun read. A real work of graphic art as well.

Hats off to the TFWW crew. Given what they've been through the past few weeks, I'm going to be doing a lot of my Christmas shopping at TFWW. You should too.

Wednesday, November 14, 2012

Video-Routing Dog Holes


This week at Benchcrafted we're building a Split Top Roubo for a long-overdue website update. We need to take some fresh pics of the STR with our new handwheels, and the Crisscross. We're also taking the opportunity to shoot some video of a few aspects of the build that we'd thought potential builders would find useful. 

First up is a video on how we cut square bench dog holes. You might be surprised how many folks think these are done with a chisel and mallet. They are actually milled into the side of the dog hole board (strip), capped with a thin piece, then glued to the rest of the top.

Getting all that wood out of the way is not easy. Even for machines. Okay, a dado head and a sliding table saw is simply the best way to do it, but not everyone has access to a machine like that. The next best route, ahem, is a router. 

Here's how we get excellent results, without burning or blowout, efficiently and safely. (You might want to read this post before you read this one further, we've been over some of this before.)

First we lay out every dog hole and draw its extents clearly with a pencil. Then we mark a big X where each hole goes. Once you get rolling and moving the template around its very easy to mess up locations. The big X really helps. 

Then we use a square and marking knife to scribe across the grain at each hole, on the top edge and bottom edge of the dog strip. This helps prevent blowout from the router, and makes a really clean, crisp opening. Don't skip this step, although we say its sort-of optional in that older post. Ignore that. 

We use two routers. The first one uses a template guide that keeps the bit about 1/8" away from the template. This is a hogging cut, but requires care to execute. It get lots of material out of the way so the second router can work at ease and make a fine cut without a lot of load.

The other line of defense in eliminating blowout is to use climb cuts--that's when you move the router in the same direction the bit it rotating. It's dangerous if you're unfamiliar with the technique, so read up and practice if you're uneasy. Two of the four arrises in each hole are favorable for anti-climb ("regular" against-the-rotation) cutting, and two require climb cutting (anti-climb cutting would blowout the unsupported grain). If this all sounds confusing, just keep this in mind. When riding the template (with both router setups) you ALWAYS take a cut by entering from the outside and moving INTO the hole. NEVER route by entering from one end, then riding the template out the other end--you'll blow out. Entering in an anti-climb cut, you'll need to move away from the template about 2/3 of the way through the cut, exit, then re-enter the same side--you'll now be climb cutting. DO NOT start routing with a climb cut. By beginning each side anti-climb and routing away almost all of the material, you leave little chance for the router to "bite" when you re-enter for the climb cut, since there isn't much material left to bite. 


Here's the final line of defence against blowout. It's a cutter I call "super bit". A machinist friend gave me this bit some time ago when it became too dull to do quality milling in metal. Its a solid carbide, four flute, center cutting end mill. And it is simply amazing. A couple months ago I took this bit to Kelly Mehler's School of Woodworking to teach a class on building workbenches. This bit saved the class. I bet we milled close to 100 mortises with it, in hard maple. I still have not sharpened the bit. I just  clean it. That's it. The cutter is 1/2" diameter and the smooth shank is exactly the same diameter as the cutting diameter. So I use the smooth portion of the shank as a bearing. It's the best pattern bit I've ever used.

The cutting geometry of the bit allows it to cut wood, especially hard, dense, figured wood, with virtually no regard to grain direction. It will cut end grain maple and leave a silky-smooth surface in its wake. It is in a word, awesome. Make sure you click on the image below and appreciate the quality of cut in this hard maple.


  And finally, here is the video.


Friday, November 9, 2012

Moxon Update


Some of you may have noticed a long lead time for Moxon Vises. We apologize for that.

Earlier this year we retooled our Moxon handwheel and created a new foundry pattern so the handwheels on the Moxon vise feature the same design as our Tail vise and Glide leg vise.

We thought we'd planned well in advance of the change, and didn't expect any delays. But then we experienced a perfect storm of hiccups. The patternmaker made a mistake. Then we poured a test mould. The draft on the center hub needed tweeking, so back to the patternmaker. Then due to another goof, the pattern sat in limbo for a week. During that week one of the foundry's furnaces went down. And parts had to be manufactured to fix it. By the time the pattern finally found its way to the foundry, the other furnace had broken down! If I wasn't already bald, I would have pulled all my hair out.

Here's the good news. Yesterday I personally drove a ton (literally) of Moxon handwheel castings from our foundry to our machine shop. And by the end of next week we should be boxing up our new Moxon vises with the updated handwheels. That is, if another perfect storm doesn't blow in.

Have a good weekend! And thanks for your patience.

Wednesday, October 31, 2012

WIA Cincinnati 2012


This is a post we've struggled to write. For the first time since its inception in 2008, Benchcrafted won't be at WIA this year. We've traveled all over the country to attend this event, but this year the WIA schedule simply proved to be too difficult to fit in for us. We're going to miss visiting with old and new customers alike, and spending time (always too limited) with our fellow hand-tool enthusiasts, which always proves to be enormously motivational and inspirational. Coming home from WIA always has me personally itching to make furniture and new Benchcrafted products.

The upside to us not attending is this. We're focusing on keeping vises in stock, and getting our newer products on the shelf quicker and more efficiently.

We won't be entirely absent from WIA however. Our good friend Raney Nelson of Daed Toolworks asked us a few weeks ago if we had an extra demo bench we could spare for the show. Well, of course we did, since we won't be there. The bench we sent for the Daed Toolworks booth features our new handwheels on both the tail vise and Glide leg vise, as well as a production prototype of the new Crisscross. If you stop by DTW's booth, do yourself a favor (and be cordial to Raney) and try out his hand-made infill planes before bombarding him with questions about our stuff (he uses Benchcrafted vises in his furniture shop too) That's Raney in the picture at the top.

I've also heard through the grapevine (read, Jeff Miller) that Andy Brownell will be bringing his Split Top Roubo (with our vises) to demo in the Gorilla Glue booth. If you glance over at the big Gorilla Glue sign and think "eh, its just glue" you're doing yourself a disservice. Andy always brings a project to the show (and Andy builds NICE furniture) and works on it in real time for the entire weekend. I'm guessing he'll also have his traveling Anarchist's tool chest along as well. I've seen it. It's gorgeous.


Friday, October 26, 2012

Benchcrafted's Autumn Tent Sale


When we have a tent sale, we do it up right. First we call Ahmed the tent guy, and he comes over in a busted Land Rover, sets up the tent with some cousins. After a short nap, some tea and sweets, he then takes off his 1998 NIB Tommy Hilfiger shirt and Gap jeans, dons his white robe and picnic tablecloth do-rag and sets up to offer the best deals this side of Damascus.

Of course there is no actual Benchcrafted Autumn Tent Sale. But we do in fact have some things that we'd like to sell. And we like tents, incidentally. These are demo vises, or blems, or the only pair of vises that someone has returned to us. Unopened. Um, we're not kidding about the latter. We've had one return since we started this. Yeah, one return. That's one. Just one. Only one. Okay, onto the goods.

Note: All vises listed below feature our previous handwheel (pictured below)


Item #1 SOLD
Tail Vise. Brand new. Unopened. $339

Item #2 SOLD
Glide Leg Vise. Brand new. Unopened. $319

Item #3 SOLD
Glide Leg Vise. Demo (lightly used, no visible or functional wear) $295

Item #4
Glide Leg Vise. Blem (some casting voids on the back side of the handwheel where you'll never see them) $295 SOLD

Item #5 SOLD
Moxon Vise. Blem. Some roughness in the casting. No functional deficits. $129

Item #6 SOLD
Moxon Vise. Blem. Some roughness in the casting. No functional deficits. $129

Item #7 SOLD
Glide Leg Vise. Demo (lightly used, no visible or functional wear) $295

Item #8 SOLD
Glide Leg Vise. Demo (lightly used, no visible or functional wear) Baked flax finish on the handwheel. $295

Item #9
Handwheel knob. These are the rosewood knobs we use on our handwheels (see pic above). These didn't meet spec, but are completely functional with a little TLC. Sometimes the knobs are a tad wet when we turn them, and the hole becomes oblong. A quick pass through with a rat tail file should get them spinning nice. We usually hold onto these and replace every handwheel knob on our shop machines with these, but we've done as much as we can of that. These fit a 3/8 X 1-3/4 shoulder bolt. $6

Item #10
Handwheel knob. Same as item #9, only these fit a 1/2 X 1-3/4 shoulder bolt. $6

Shipping is not included. To buy anything, drop an email to info@benchcrafted.com with a list of what you want, and your mailing address. We'll email you a bill for the goods and shipping.

Now, where's Uncle Tannous gone with my Shawarma.....


Saturday, October 20, 2012

Glide Instructions Update

FYI, We've uploaded the latest version of our Glide Leg Vise Instructions. We corrected a couple typos and deleted some superfluous information.

See our downloads page. 

Wednesday, October 10, 2012

Galbert And Zajicek


Its 6 am and I'm rooting through my neighbor's trash. I come across some vinyl records. The album cover says in bold, goldenrod text "Broadway Musicals: Galbert and Zajicek's Greatest Hits."

And then I wake up.

Yesterday I went to bed thinking of two new tools I got in the mail this week. I don't do tool reviews on this blog, but I do occasionally post about tools that excite me.

I got a call from my friend Bob Zajicek earlier this week about a new marking knife he's about to release. The Kerf Kadet Carbide features, wait for it, a carbide blade (didn't see that coming, right?) ground to perfection by Czeck Edge master tool grinders. The knife came razor sharp, and didn't seem brittle like I was expecting it to. It scribed crisp lines across a piece of beech. The blade is .030" thick for getting between skinny pins, or other skinny places. Why carbide? Why not? It holds an edge like, a really long time, so you don't have to sharpen as often. I can sharpen, but I don't ever do it for fun. Does it take a keen edge? Ask Bob about his experience assembling these knives. But don't if you're squeamish. It's sharp.

Call my Czeck (Edge) friend Bob at bobzajicek1@gmail.com for more info.


And now for the tool that will change the way I work.

The Chairnotes Travisher

I've been corresponding with Peter Galbert for some years now. Mostly because he builds my favorite modern chairs, but also because I hope I'll become close enough that he'll give me a free chair making lesson. Okay, that last bit is completely untrue. I actually want several lessons. Anyway, a couple months ago, in my measly attempt to convince myself I'm a budding chairmaker, I drew up some Sketchup prints for Peter's Smarthead shaving horse. (I have yet to build one.) In the process, Peter's travisher caught my eye. And I figured that even a budding chairmaker needs a good travisher, so I ordered one from Pete.

Last week it arrived. As I opened the box I knew I had a special tool in my possession. The crisp arrises, flowing curves, velvety walnut, glimmering steel and lustered brass, the entire tool floored me. This collaboration between Peter Galbert and his assistant Claire Minihan (see their initials emblazoned in the tool's throat) has become my new favorite tool.

In fact, just by possessing it, I now feel I can claim the title of master chairmaker. Okay, that's going a bit far. But this is truly one sweet tool. I took some shavings from a piece of dry walnut with the travisher and something hit me. I've never made a chair seat, but I immediately knew that this tool would be seeing some serious use in applying some textural elements to my other furniture work.

But enough talk. Here are some pics of my new travisher. For more info, visit Pete's site Chairnotes Tools.


Monday, October 8, 2012

Glide Instructions Update


We've made a change to the Glide Leg Vise acetal bushing that increases the performance of the Glide when used with the Crisscross. The bushing has always been used for lateral stability (left / right) of the screw. In order to make the installation a smidge easier we're now shipping all Glide vises with our improved bushing. The central hole is now elongated vertically to allow more freedom of movement and wiggle room during the installation process. It's a little tweak, that's it. If you currently use a Glide with a round hole in the bushing, don't think about upgrading. Your current vise will work fine with it. If, however, you will be installing a Crisscross in a Glide with the old bushing, you may want to upgrade. We'll have ordering details shortly before the Crisscross is ready to ship. As always, stay tuned to this blog for all the latest product news here at Benchcrafted.

To download the latest Glide Instructions (page 19 shows the bushing details) visit our downloads page here: http://www.benchcrafted.com/Downloads.html

Monday, October 1, 2012

Come to Handworks Next May


Next May a bunch of modern hand tool makers are getting together in a restored dairy barn right in the middle of the communal village of Amana, Iowa. 

This event has been in the making for a few years, and we're excited to be one of the exhibitors. Basically, it's a couple days for all us hand tool enthusiasts (makers and users alike) to get together and talk tools with each other, learn about the maker's wares, enjoy each other's company, get inspired, and, oh yeah, sell and buy some tools! Anyone and everyone is invited, and admission is free. To boot, there are some phenomenal door prizes being given away.

Amana is actually the name of several tiny villages scattered over about a 5 mile swath of Iowa countryside. Amana was established in the 19th century by German immigrants after they came from the old country in search of a place to settle their utopian society. The society actually still exists, albeit in a more tourist-friendly format. In other words, all the old-world crafts are still practiced in the various villages. And there are furniture shops still in business, plus a broom shop, brewery (excellent craft beer!), smokehouse, blacksmith shop, laceworks, and a world-class woolen mill. Follow the Amana Colonies link at the Handworks website for more.

Handworks takes place on May 24-25. There's lots to do in Amana after Handworks, to take advantage of the holiday weekend. Antiquing, museums, functioning craft shops, restaurants, and wineries. Consider bringing your significant other and family to make the best out of the weekend.

Hope to see you there!


Friday, September 28, 2012

Crisscrosss Pricing

As promised, below is pricing on the forthcoming Benchcrafted Crisscross.

We'll be offering the Crisscross in two separate configurations depending on the installation method. Either version will work with any leg vise.You don't need a Benchcrafted Glide to use the Crisscross. 

Crisscross


Crisscross Solo  $99 (pictured above)


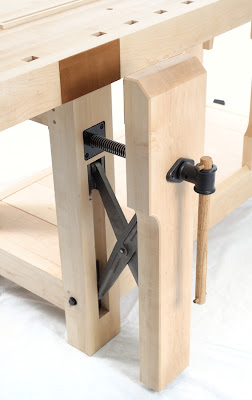
The upper ends of the Crisscross arms pivot on two 3/8" steel rods. In order for the Crisscross to function properly, these two rods must be parallel with each other, and perpendicular to the two arms. If you're building a new bench (or a stand-alone vise) where you can drill accurately for these pivot rods using a drill press, the Crisscross Solo will suit your needs. All necessary hardware is included to install the Crisscross Solo with a leg vise of your choice. This version will take less time to install than the Retrofit (see below). However, the Crisscross Solo is less forgiving to install. You need to be accurate about your pivot rod locations and get them straight through the leg and chop. If you make a mistake, you'll have to relocate the pivot rods. We'll cover this in detail in the forthcoming installation instructions.


Crisscross Retro $139 (pictured above)

If you'll be retrofitting a Crisscross to an existing bench, where it would be difficult to drill deep, straight holes for these pivot rods through thick wood by hand (since it will likely be impossible to drill an assembled bench leg using a drill press) the Crisscross Retro will be the better choice. The Retro includes two machined cast iron brackets that automatically provide accurately positioned pivot rod holes. All you have to do it excavate a slightly wider section of the mortise in your leg and chop, and simply screw the brackets in place. No deep drilling required. You may choose to use the Retro version even in new construction, in order to simplify the process and help achieve accurate pivot pins.

Glide Leg Vise w/ Crisscross

We're also offering a special price when you purchase a Glide Leg Vise along with a Crisscross. (These packages DO NOT include roller bracket hardware, which are not needed with the Crisscross)

Glide Crisscross Solo: $399

A Benchcrafted Glide Leg Vise with a Crisscross Solo. Everything you need to build a Glide Leg Vise with a Crisscross, except for wood.


Glide Crisscross Retro: $439

A Benchcrafted Glide Leg Vise with a Crisscross Retro. Everything you need to build a Glide Leg Vise with a Crisscross, except for wood. This includes the two machined brackets.

Benchmaker Packages 

Split Top Roubo and Shaker Benchmaker's packages will also be available with the Glide Crisscross.

Split Top Roubo Benchmaker's Package w/ Glide Crisscross Solo: $809

Split Top Roubo Benchmaker's Package w/ Glide Crisscross Retro: $849

Shaker Benchmaker's Package w/ Glide Crisscross Solo: $829

Shaker Benchmaker's Package w/ Glide Crisscross Retro: $869

Pre Ordering 

Crisscrosses, Glide Crisscrosses, and Benchmaker's Packages with Crisscross are available for pre-ordering now on our Store page

Special discount for past Glide customers

For customers who purchased a Glide leg vise between February 1st, 2012 and  September 1st, 2012, we will offer free domestic shipping (a $16.00 average value) on both Crisscross Solo and Crisscross Retro. This, of course, does not apply to other purchases. It's for the Crisscross Solo or Retro only. For international Glide owners, we'll give a prorated discount. Inquire for rates.

To get free shipping, simply order a Crisscross, then include a note with your order stating that you bought a Glide between those dates.


Lead times

Ship date for the first run of Crisscrosses is December 3. If we complete the run early, we'll ship before then. Depending on demand, we may sell out quickly. Order now to increase your chances of getting your Crisscross soon. 
More info

To view everything we've published about the Crisscross, follow this link. This includes installation details, dimensions, demo videos. Everything. In the coming weeks we'll update the website with a Crisscross page and installation instructions.


Thursday, September 20, 2012

Crisscross Installation - A Preview


For the past week we've been putting in long days packing vises. Yes, we're happy to say that we're shipping vises again. If you've ordered in the past two months (ouch!) your vises may have already gone out, or you'll be hearing from us very soon about shipping details. So keep your eyes peeled for notifications in your inbox. By this time next week, all open orders should be filled.

Now, for those of you who are looking to install a Crisscross we have some good news. We've been preparing some drawings for you. We don't normally recommend that you cut into your bench before the hardware is in hand. But in this case you can feel fairly safe in doing so. The mortise for the Crisscross is fairly straigh forward. It'd be pretty hard to goof up. If you're not 100% confident though, better wait. Study the drawings and instructions carefully and lay out everything in actual size on your bench parts before cutting anything. A couple weeks ago we prepped nine benches for Crisscrosses, so we've got virtually all the install bugs worked out. If you have any questions or concerns, post them as comments below so all can benefit.

The best way to excavate the long Crisscross mortises is on a drill press with a large Forstner bit. This will hog out tons of material in short order. Then clean up the little crescent shapes with a router and fence, or simply with a paring chisel.

You can also do your base joinery based on the drawings in the PDF.

If you have a Glide in hand (or other leg vise hardware like a simple bench screw) do not install it yet. There is an installation sequence to be followed to allow the Crisscross and Glide (or bench screw) to work best with each other. We'll cover that in more detail when the Crisscross instructions are finalized.

Now I'm sure you're wondering when the Crisscross will be available, and how much it will cost. We're very close to having pricing finalized. Should be within a week. As for production date, probably sometime in November. Definitely well before Christmas.

Here is the link to download the PDF:

Crisscross Installation Preview


Thursday, September 13, 2012

Gallery of Benches


Take a look at some of the benches produced by members of Marc Spagnuolo's Wood Whisperer Guild. Click here for the gallery.

Marc has made some changes to the Guild site of late, but most notably you can now purchase projects ala carte. The Split Top Roubo is $100. Right now, this is as close as you'll get to one-on-one instruction on building our bench. We've seen all the videos. They are excellent. Marc has solid techniques, but he also offers alternatives for those versed in different schools of work.

Definitely worth the money if you're a beginning woodworker looking to build a solid bench.


Monday, September 10, 2012

Teaching At Kelly Mehler's, or How To Build A Bench In a Tropical Storm


Last week I drove through the remnants of Hurricane Isaac towards Berea, Kentucky to teach a week-long class in building our Split Top Roubo bench. After 10 hours driving through constant rain, I was hoping for clear skies the rest of the week. And that pretty-much guaranteed that it would rain during the entire class.

Building nine full-size benches in any shop is demanding work, so the plan, as it usually is at Kelly Mehler's Woodworking School, is to do the big, heavy work outside in the yard. But how does one do that when its raining at the worst possible moments?

Tarps. Shouting. Scrambling. Cursing. Tarps.

By week's end, the yard in front of Kelly's looked like a rainy day at Woodstock. And any one of the motley crew of haggard woodworkers could have doubled as walk-ins on an episode of Dukes of Hazzard. Except for Mike. Where do you get those self-renewing clothes? He looked as fresh at 9pm as 9am.

I learned a few things last week about building two tons of hard maple workbenches in wet conditions.

- Blue-colored tarps, no matter how thick, or how expensive, by default are always junk.

- Other-colored tarps are also junk.

- It always starts raining when everyone is upstairs in the middle of a glue up

- When the humidity is 99% and you drill a hole for a metal part to go through, 2 minutes later you'll need to redrill that hole because it will have shrunk. After another 2 minutes, redrill again. Repeat for every 2 minute interval thereafter.

- Vise manufacturers should forget, no REALLY forget, every metalworking tolerance when building ten benches in one week.

- When hard maple gets wet it looks really pretty. It also sticks to every cast iron machine surface like Looney Tunes Acme glue.

- Wear saftey glasses when 10 people start whacking drawbore pegs. Oak shrapnel!

- It's actually possible to install a Benchcrafted Tail Vise in the rain. But I wouldn't recommend it.

- A 4" thick, hard maple workbench top that has sat out all night in a torrential downpour will be wet (and pretty) in the morning, but it will be just fine. Like Kelly said, "that tree's been through a lot in its lifetime" (a little water isn't going to hurt it.) A 4" top is prit near indestructible.

I'm convinced that school director Kelly Mehler, who prepped the thousands of board feet of hard rock maple required for the class, is some sort of hybrid being with Olympic energy, patience, wisdom, and wit. Someday I will return to Kelly's as a student. That may be my only ticket back in the place!


Thursday, August 30, 2012

Crisscross Update - Video


Hard to believe it will be September in a day. It seems like we just got back from the Lie-Nielsen Hand Tool Event at Jeff Miller's where we first showed the new Benchcrafted Crisscross. That was back in April.

Between our new handwheels and the Crisscross we're just about ready for a week off. But nope, we're trudging forward to get the Crisscross in production as soon as we can.

This past week showed some great progress. First off, we picked up a small batch of the first castings of the Crisscross arms and the brackets that attach the arms to your bench. And over the past weekend we machined up the first pre-production samples to test out the castings and our machining process.


We still have few small details to work out, but our pre-production unit is singing. If you've been following along, you know that the prototype was quite large. The production model is 6" shorter, and actually works better than the prototype as a result. The Crisscross can be used in benches as short as 30" (even shorter if you mount the screw a bit higher in the leg.) The jaws will open to about 9". Way more than you'll ever need. The cool part is that the chop glides in and out no matter how open the jaws. And coupled with our Glide Leg Vise, the thing is just a ton of fun to operate, and not to mention, effective. The vise holds wood like, well, like crazy. Compared to a standard leg vise with a parallel guide and pin, the Crisscross gives a little more ease when approaching the final grip. You have more feedback. With a pin its more abrupt and crisp, especially with a thick chop. Feel-wise, one isn't better, its just different. My own personal opinion is another thing. I'll be retrofitting my bench with a Crisscross as soon as I can. I never minded moving the pin, but did I enjoy it? Well.....


If you don't have a Glide, can't afford one, or just don't like handwheels (what's wrong with you?), the Crisscross works like the traditional leg vise of your dreams when paired with a plain-jane bench screw, metal or wood. Well, we haven't tried one with wood yet, but it will work fine. We'll get one mounted up with a wood screw and report back.

The vise in the pics and video was built with a rather long "leg" portion. This was done to operate the vise at a convenient height, and also so the screw would not interfere with the bench the vise is temporarily mounted to. The length of the chop here is 33", so pretty typical for a standard bench. There is over 8" between the screw and the top of the chop (in other words the top of the bench.) You will see some lateral motion in the chop as the vise is operated. This is completely intentional and built into the vise during the machining process. A vise needs a certain amount of give in specific areas, just like a fine suit.

We should have pricing by the end of the month (September, not tomorrow!) and hopefully a release date as well.

Here's a short video.