Showing posts with label Glide Leg Vise. Show all posts
Friday, April 12, 2019
New Item: Black Wrinkle Knobs
Our new vintage style black wrinkle aluminum knobs are now available as an accessory for your Benchcrafted vises. You can update any Glide or Tail Vise produced since mid-2012, your shoulder bolts and spacer washers will fit right up (shoulder bolts or spacer washers are not available separately) $16 ea. Purchase on our Glide or Tail Vise pages.
Categories
Glide Leg Vise,
New Products,
Tail Vise
Monday, May 21, 2018
Mark's Roubo By Hand
Here is my finished bench and I am very happy with it! I’m pretty new at this and don’t own a power jointer or planer - so - I had plenty of hand planing to complete this. At the end of the day, I’m thankful because I am very comfortable with four squaring large pieces as well as flattening a large top with only hand tools. I used 2 x 12 SYP construction lumber. I tried to end up with primarily rift sawn lumber to avoid the large “cathedral grain” flat sawn boards and no knots. I did pretty well with this except for the sliding deadman. That was my last part and I was out of lumber...LOL
My first project on my bench was the gap stop. Oh what a blessing it is to use such a fine bench. I didn’t even know what I was missing.
Thanks John and Jameel - I appreciate your products. I hope to make many fine pieces of furniture for my family and friends. And also make plenty of memories next to my new bench. Love it!!!!
Mark Ortiz
Categories
Glide Leg Vise,
Split-Top Roubo,
Tail Vise,
Unsolicited
Tuesday, October 11, 2016
Aaron Moore's Compact Bench
Aaron Moore of Walke Moore Tools sent us pics of his bench that he built for demoing tools at woodworking shows. It was sized to fit in the back of the Walke Moore Tools show van.
Moore's bench is a good example of a short, simple bench that is quick and easy to build. Only 72" long, with a 2 1/2" thick top, about the only thing we'd change is to add a planing stop. And with our's available in the next day or so, Aaron will have his chance (hint!)
The bench features our Glide M, and a very understated yet classy black milk paint finish on the base and chop. We especially like the patined arris on the chop, with the hard maple showing through. Gives the bench a bit of the vector graphics look (Vectrex anyone?)
Hope you bring the bench to Handworks next year, Aaron.
Categories
Classic Workbench,
Glide Leg Vise,
Split-Top Roubo
Monday, August 22, 2016
An Elegant, Simple Bench in Walnut
Craig Thibodeau of CT Fine Furniture recently sent in these pictures of his minimalist split-top workbench in walnut, featuring our Glide C leg vise.
"Here are the photos of my split top Roubo with your vise hardware. It's not quite as clean as it was a few months ago but it has been serving me well and is naturally starting to show some of the inevitable marks of regular use. Best thing I've done for my shop in a long time."
Craig had the following to say about his bench, from his Instagram:
"And of course the main feature of this space is my split top Roubo bench with the @benchcrafted criss cross leg vise. I still find it amazing how useful this bench/vise combo has been over the past few months. I'm glad I waited so long before building a bench so I could really fine tune it to my way of working.
I'm definitely not a proponent of making a workbench as your first woodworking project. I think you need to get some time in doing some woodworking first so you can learn what type of work you want to do and how you like to work. Plus building a good quality bench is not a beginner project, it's big and heavy and takes big equipment to prep the materials properly unless your a hand tool only guy. Just my opinion of course."
"Since I had the camera out I took a few more pictures of my Roubo bench just for fun. Here's a decent shot of the @benchcrafted criss cross leg vise hardware. I'm still amazed how well the leg vise works, especially when combined with the sliding deadman. Super strong holding of workpieces with almost no effort, on my old vice I had to crank down on the handle to hold parts tight but with this one just a light turn of the handle locks pieces in place. That and the hardware really does look kind of cool. I sprayed my handle/wheel with flat black paint before assembly and left off the wooden ships wheel knobs it came with, they didn't seem necessary to me. No affiliation with Benchcrafted of course but I do like their hardware."
Don't let the simplicity of Craig's bench fool you. Craig is a master furniture maker, which makes the simplicity of the bench so satisfying. Many beginning woodworkers struggle with the minutiae of bench design, not knowing exactly what they want in a bench and vises. And that's where our bench plans come in. They've all been vetted by furniture makers with decades of experience. So chances are, if you've not got a lot of experience, building one of our benches will all but guarantee satisfaction.
But we don't want to make this post about us. So enjoy this video of one of Craig's pieces.
Categories
Classic Workbench,
Glide Leg Vise,
Split-Top Roubo
Thursday, June 25, 2015
The Right Amount Of Precision
We often field questions about the accuracy required to install our vises, or the precision required when building a bench. More often than not the assumption is that you need to get your wood perfect down to the last thousandth of an inch. Or something aligned dead on. But the one that makes us smile the most is the one where folks think that vise jaws need to close like two components of the international space station mating up together for the first time in zero gravity.
The truth is, precision can screw things up. When speaking of how vises hold wood, we like accuracy. And what I mean by that is that the vise grabs and holds the wood perfectly every time. What we aren't looking for here is precision. In other words, the jaws of a vise should have some amount of free rotational movement. This accomplishes two thing. It keeps the mechanism moving freely, and it allows the jaw or chop to conform to the shape of the workpiece.
To achieve this, we machine our vises accurately (they all perform consistently), but only build precision where needed. Some of our customers complain that their chop rotates horizontally after installing their vise. They assume the chop is supposed to close perfectly parallel with the front edge of the bench and not rotate, but be stiff, like a Record-style vise. But that precision is a handicap. It restricts movement, and all but guarantees that the vise will work stiffly. Yes, we work mostly with parallel-faced stock, but occasionally we need to hold other shapes too. But if the chop is left free to rotate a bit, it will naturally seat against flat stock and hold it fast, and also hold tapered work.
To illustrate, this week we're building some staked furniture and working some tapered octagonal legs for a small reading desk. The Glide, with its intentional imprecision has been perfect for this. These legs taper from 2-5/8" to 1-5/8" over 28".
Tuesday, March 24, 2015
What Is Toe In?
Toe-in can be confusing. Lots of people think their leg vise (or any face vise) should close with perfectly parallel jaws, like a veneer press. And in theory, that would indeed be ideal, but only if your work piece also has perfectly parallel faces. The reality is that its easier and more functional to make a vise with toe-in than with perfectly parallel jaws, with the bonus that toed-in jaws hold less perfect pieces as perfectly well as perfectly parallel pieces.
Here's why toe-in works. Think of your leg vise as a holdfast, with the moving jaw (chop) being the holdfast itself, and the leg your bench top. You would never place the pad of the holdfast right at the edge of a board, where the holding pressure is only on a very small portion of the board. Rather, you try and place your holdfast near the center of the board, to distribute the clamping pressure over a wide area. If your vise didn't have toe-in, chances are it would grab your workpiece, like the holdfast placed at the edge of the board, below the center of the piece, that is, closer to the bottom edge near the vise screw (where there's less holding power.) Then when you go to plane the edge of your board, it slips and pivots. That's because you're holding the piece at the farthest point (in the vise's weak spot) from where you're stressing the board. This arrangement puts the most stress on the board, making it very easy for the board to shift in the vise.
Toe-in moves the holdfast pad (moving jaw) from the edge to the middle of the board, and thus pins the board firmly to the bench top (vise leg.)
The other reason for toe-in is for workpiece stability. If you're working the board into the edge of the bench (dovetailing), and not along the bench (edge planing) you want the piece held at the very top edge of vise opening. If the piece were held lower down in the vise (lack of toe-in) the jaws will be slightly open at the top and your board can vibrate in the jaw during sawing.
Below is a customer pic of their Glide installation. The top of the bench will fall between the red arrows. The Crisscross is built with toe-in, and because of a number of factors, the toe-in will be slightly variable from bench to bench. But that's the beauty of toe-in. It doesn't need to be precise. As long as there is some toe-in, you're fine. The range is very forgiving. At the bottom of this chop, there's about a 1/2" gap, but once the jaw reaches the top 4" of the vise (the only area that holds your work) the toe becomes subtle. And that's a good thing, since once you tighten the vise down a bit, the jaw flexes slightly and spreads holding pressure over more of your workpiece, with the most pressure right at the top of the jaw--exactly where you want it.
Categories
Classic Leg Vise,
Crisscross,
Events,
Glide Leg Vise
Thursday, February 12, 2015
How We're Handling The Knobs
Due to a fire at Rutland Plywood in 2014, the availability and manufacture of Dymondwood has ceased. We turned our last knob from the material a couple weeks ago and all those knobs are already spoken for. Plus, we're in the red on a few, which has caused our lead times to grow a bit from our standard 1-2 weeks (in which we usually ship within a couple days) to 3-4 weeks.
We tried our best to hold out until Rutland rebuilt, but its not happening.
Our vises were fitted with rosewood knobs from the very beginning, but when Cocobolo was put on the CITES list, we decided to abandon its use and move to Dymondwood. Cost was a factor, but the future instability of the species was the the nail in the coffin. So it's difficult to move from a high-class material like rosewood to anything else. With the loss of Rutland, we were forced to take a closer look at what we wanted to do in the long run. Our goal is getting our vises in customer's hands in a timely manner, and dealing with uncertain materials is an enormous pain for us and frustrating for customers. Who wants any of that?
So here's what we're doing.
From now on all of our M-series vises (Glide M, Tail Vise M) will be fitted with knobs made from acrylic-infused American black cherry. While new cherry knobs might have a similar tonal value to the infused beech knobs of our C-series vises, with UV exposure the cherry will darken nicely. Why cherry? It's abundant and it looks good. The acrylic infusion process renders the wood entirely stable, and incredibly durable.
For a short period while we're tooling up for producing cherry knobs, M-series customers may receive infused beech knobs with their vises. If you are one of those customers, and would like to outfit your vise(s) with cherry knobs once we have them available, drop us an email and we'll sell you a set at a special price. This offer is only for those who received beech knobs with M-series vises. We won't be offering knobs of either species ala carte, or the option of choosing a different species.
UPDATE: We're ahead of schedule and barring any unforeseen snafus, we won't be shipping any beech with M series vises, all orders will receive the infused cherry.
Categories
Events,
Glide Leg Vise,
Tail Vise
Wednesday, February 4, 2015
Knobs And The Lead Times
UPDATE: There seems to be some confusion concerning lead times. We've always had lead times, clearly posted on our Store page. Most of the year the leads are 1-2 weeks. Our lead times do not reflect and have never reflected anything other than a waxing and waning of demand as pertains to the time of year, i.e. Christmas and especially post-Christmas demand was quite unexpected this year. The addition of overseas dealers has also had an impact on lead times.
We've been a tad behind lately in our order fulfillment. For this we apologize. Here's the story behind what's happening.
First, the holidays. People buy more stuff, obviously. We try to anticipate sales, but the last guy who got it right is sitting on a beach in Tahiti right now. We're sitting elsewhere.
Second, Hollywood. Paramount Pictures is filming an epic docudrama about the construction of the Statue of Liberty, and the set designer is recreating a late 19th c. French carpentry shop for the movie. So we're building 40 benches in French Oak, outfitted with Classic leg vises for the studio. This has taken enormous amounts of time.
Third. Dymondwood. Rutland Ply, the makers of Dymondwood have not rebuilt. We've been told that another facility is being readied for production, but when is still a question mark, in addition to all the other question marks associated with getting something new up and running. We've used up all we can find. For now we'll be filling some orders for M-series vises with beech knobs. Yes, it looks nothing like Dymondwood, but it's functional. We're also hesitant to use any sort of actual rosewood, due to supply issues, and the problems it poses with drying and turning. So we're looking into different materials which should alleviate much of the lead time issues in the next couple weeks. Although a departure from our traditional rosewood look, we're considering doing something completely different for the M-series vises. Ceramic-coated aluminum (sort of a modern, tactical look) Micarta, and if the price of red metals works out, solid bronze.
We'll have an announcement in the near future about what we end up doing. But for the time being, if you order a vise now, you'll likely be getting beech knobs. If you'd like to upgrade later to whatever we end up using, we'll make that option available.
Oh, the part about the movie was not true. But it would be pretty neat to see that in a movie, wouldn't it?
Categories
Events,
Glide Leg Vise,
Tail Vise
Monday, December 1, 2014
Don't Crochet With Your Leg Vise
We get this question a lot.
"Chris Schwarz put a crochet and a leg vise on his first Roubo bench, why don't you include one in your plans?"
Chris' first bench was largely an experiment. He built it to prove out Roubo's design in a modern setting. The rest as they say, is history. We were of course influenced by Chris' work, but our bench is Plate 11 at its core. In "L'Art du Menuisier" we don't have an illustration of the bench with the leg vise installed (discounting pl. 279--which incidentally has no crochet), but only close-ups of the leg vise in Plate 11. Roubo doesn't specifically say that benches with leg vises shouldn't have a crochet. But he does specifically mention the superiority of the leg vise for furniture makers. So we put two and two together and didn't include a crochet in our plans. If you do some research you'll find that anyone who's used a crochet, then a leg vise, never goes back to using the crochet (Schwarz included.)
To boil it down, don't include a crochet if you're planning to install a leg vise. There are reasons why it would not only be superfluous, but also a disadvantage. A crochet reduces the capacity of the bench (see pic above).
Although Roubo doesn't show a bench sans crochet, there are plenty of French shops with Plate 11-style benches with leg vises and no crochet.
Categories
Glide Leg Vise,
Split-Top Roubo
Thursday, November 20, 2014
Cleaned Off Some Shelves
This time of year we're preparing for Black Friday. In other words, we're pondering spending that time in the shop making things other than money. We hope you do too.
Doing a little warehouse cleaning this morning we found a few vises we set aside for a moment like this. And the when the moment is right...
1. Glide Leg Vises. SOLD
This is the previous version of the Glide, with the single Dymondwood knob, and fully machine handwheel. These are vises that may have some porosity to the cast iron hanwheel (very minor) or were used on demo benches. They are 100% functional and are just slightly cosmetically deficient on the handwheel. That's it. All other parts are brand new. We usually melt these down, but these are so close to being 100%, we're offering them for your benefit. Price is $300 with Crisscross Solo (add $40 if you want a Retro.) We only have two of these.
2. Classic Leg Vise Hardware Only SOLD
The hardware we used to take the glamour shots earlier this year. If anything, this is likely nicer than what you receive when buying new, since we already buffed out the parkerizing and oiled it up. It's a beaut. Price is $130. We only have one of these. If you'd like to pair it with a Crisscross, request that when you order.
And here's how to do that. Send an email to info@benchcrafted.com stating what you'd like, including your shipping address, and we'll email you an invoice to pay. Simple as that.
Categories
Classic Leg Vise,
Glide Leg Vise
Monday, November 17, 2014
Tail Vise C Now Available
We're very pleased to announce that the new Benchcrafted Tail Vise C is available.
Here's a little background about the vise. A few months ago we released the Glide M leg vise, and with improvements came a price increase due to the added components. We immediately decided we needed to offer a lower cost alternative with the same performance as the Glide M. The Glide C was born. Naturally we realized folks would want a Benchmaker's Package with all C series vises, thus the Tail Vise C.
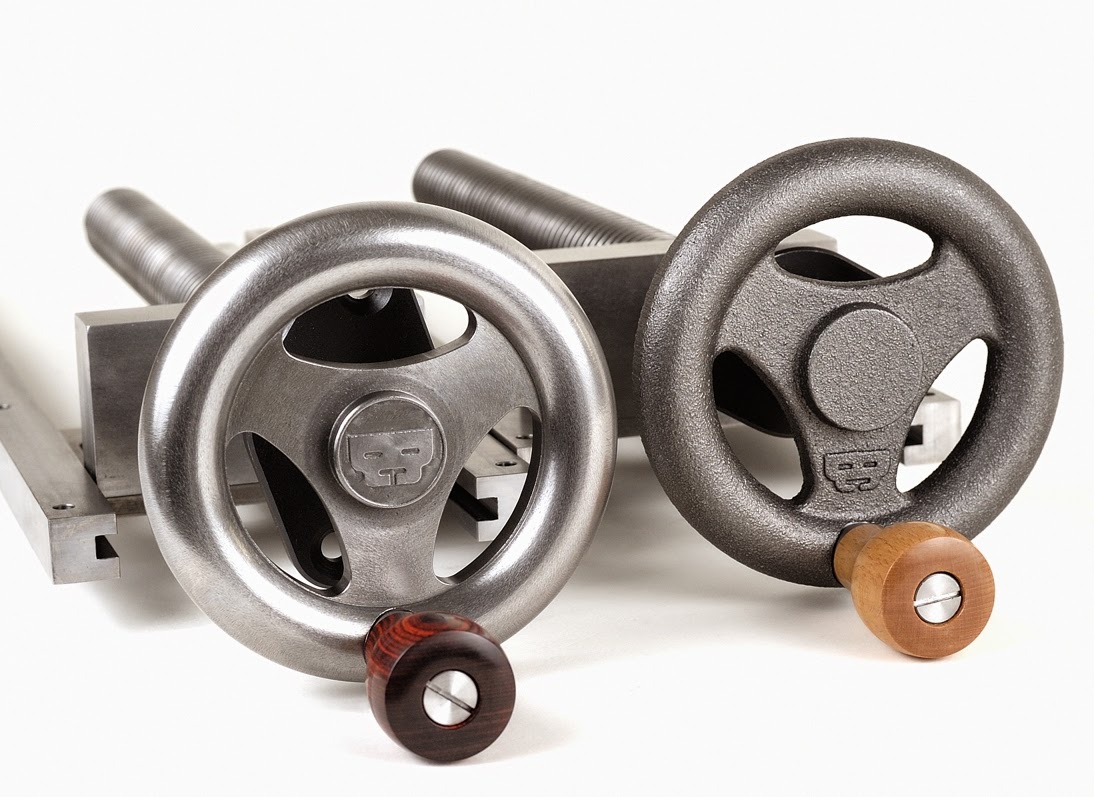
In case you're wondering, "M" denotes machined and "C" cast. These terms don't refer to the way the handwheels are manufactured (since both are cast and machined), but rather describes the final surface finish. The Tail Vise with machined handwheel will now be called the Tail Vise M. Below you can see the difference between the Tail Vise M (left) and Tail Vise C (right.) Both are made of cast gray iron, poured locally.
Aside from the obvious cost savings (our original motivation for producing the vises) the C series vises with their sand cast finish have a distinct vintage and traditional look. As a hat tip to the old toolmakers, we outfitted the C series vises use beech (acrylic infused) knobs. If you're into the vintage aesthetic, the C series nails it. I have a C series Tail Vise and Glide on my Ash bench at home at the moment. I love the understated look. The texture of the cast wheel on the Tail Vise also makes for great ergonomics, since I like to grasp the wheel itself for small adjustments.
Aside from the handwheel and knob, all other components of the Tail Vise C are identical to the Tail Vise M. It also installs and performs exactly like the M.
The Tail Vise C will be shipping shortly, and you can order now through our store page. You may need to refresh your browser.
Price for the Tail Vise C is $295 plus actual shipping.
Price for a Benchmaker's package with C series vises (with Crisscross Solo) is $699.
For those using a Classic Leg Vise in their Benchmaker's Package, the default Tail Vise choice will be the C. We will gladly sell you an M with your Classic, but you must request it via email.
Categories
Glide Leg Vise,
New Products,
Tail Vise
Wednesday, October 1, 2014
Glide C Leg VIse - Now Available
Late last week we finished packing up the first of the Glide C leg vises.They are now available to purchase.
The Glide C is different from the Glide M in two ways. First, the C handwheel is sand cast in gray iron, and then only machined to accept the acme screw and infused beech knobs (the Glide M surfaces are entirely machined after casting.) Secondly, the C uses Beech knobs instead of the deep red Dymondwood of the Glide M.
Each vise performs identically.
Why would you choose a Glide C? Two reasons. First, cost. The C is $70 less than the M. Second, looks. The C has much more of a vintage, traditional look if that's your style. It looks perfect on a Roubo bench, especially when made from ring porous hardwoods like ash or oak. It would look outstanding on a beech bench. My personal vises at home usually change pretty frequently during testing, but I currently have a C on my ash bench. I love the look.
Glide C's are available for order now on our Store Page. They ship 1-2 weeks after placing your order, but usually much faster (that lead time gives us a little wiggle room in case the fish are biting.)
Later this fall we hope to release the new Tail Vise C, so we can offer a matched set of vises in the C style.
Saturday, September 20, 2014
English Field Gates—Finished
Here's the story behind the two English field gates we built over the last couple weeks.
Traditionally these gates were used to contain livestock, but they are also quite popular nowadays for containing human livestock and livestock of the horseless (carriage) variety. We're using them to hopefully prevent deer from wandering into a garden.
I first took a serious interest in these types of gates when I stumbled on an article by Paul Sellers in an issue of Woodwork magazine (#116.) The aesthetically pleasing form of the gate, which stems from its engineering caught my eye immediately. I quickly started looking for an opportunity the build one.
I did a fair amount of research while designing the two gates, here's some of the more interesting aspects of what I discovered.
- The gates are traditionally made from air dried oak.
- The harr stile (hinge stile) was usually made from a piece with a natural bend (crook) for the most strength.
- Only the harr stile and the top rail are made from massive timbers. The rest of the gate is made of lighter, thinner stock.
- The top rail tapers in both in width and thickness to reduce weight at the latch stile.
- The joinery is robust: through wedged tenons and drawbored mortise and tenon.
- The hardware is blacksmith made
The gate is superbly engineered to prevent sag. The harr stile, top rail, and angled brace form the rigid structure, and the rest "hangs" from this structure. The top rail diminishes is both thickness and width from hinge to latch to reduce the weight at the area it can do the most damage. The drawbored joints keep everything immobile. I'm a big believer in super rigid construction. Once a joint starts to get even a little loose, there's little keeping it from getting worse.
In addition to the article in Woodwork, we also referred extensively to Alan and Gill Bridgewaters's Building Doors and Gates (Stackpole Books) This book provides loads of design and engineering advice, as well as construction techniques for building these traditional gates (plus many more styles). It even provides info for setting the posts the traditional English way so they will last longer than you and likely your children. It's a fantastic book with solid info on classic techniques. Not your typical weekend warrior "Time-Life" stuff. You can preview the book via Google Books, but if you plan to build a door or gate sometime, buy the book.
So with all that tradition in mind, here's what we did differently.
We used western red cedar instead of oak. We have a small sawmill that will cut oak to order, but we couldn't wait for the wood to get even partially dry. We needed the gates before winter. So we spent a morning at (get ready) Menards and picked through their entire stock of 6x6 western red cedar. We were able to get all the thick stock for the gates (and then some) out of the 6x6 material. All but one stick was dry. I'm guessing they don't move a lot of this stuff, I bet its been sitting there for some time. We resawed the 6x6s to get the final 3"x5" pieces for the hinge stiles and top rail. The 1"x3" rails and angled braces came out of 2x6 material that we ripped and planed down. These came from 16' boards that were 90% clear and straight. When selecting dimensional lumber I always buy the longest, widest boards I can, they are in every instance better quality than the shorter stuff. The grain on some of the stock was so excellent I was tempted to resaw it into soundboards. The dark color is supposedly more rot resistant. All but one board was deeply red. And yes, we did save big money at Menards, paying just over $2 a board foot for the cedar.
We only tapered the top rail in its height. We wanted to keep the latch stile full thickness to speed and simplify construction. I wasn't too worried about the loss in weight savings with the lightweight cedar.
We cut the top of our harr stile off and glued it to the side of the stile to get the crook. We made sure to position the lag screws in the main part of the stile and the not the added portion.
We did through wedged tenons to join the top rail and latch stile. Everywhere else we cut blind drawbored mortise and tenons with straight-grain white oak pegs.
Both gates were assembled with West System epoxy, and we also sealed the end grain at the bottoms of the stiles with the same so they didn't wick up moisture from the snow or rain. West System is the only epoxy we use around here. We like to buy the quart can of resin, pair that with a pint of hardener (we use fast most the time) and finally the pump set, which meters out exactly the correct amount of resin and hardener everytime. It seems expensive, and you do loose some epoxy if all you do are small jobs, but we've found that the added cost usually evens out if you consider the higher cost of buying syringes, which eventually go bad anyway. The West System last for years, and its top quality. It's the stuff boat builders use after all.
We tried to find the best hardware we could find without going broke. We sourced this from Snug Cottage Hardware. They have a great selection specifically designed for heavy gates like this, as well as free plans to build a number of different gate styles. And almost everything is available hot dipped galvanized and black powder coated (that's what we bought.) We've bought the black painted garbage from the big box stores before. It rusts. That's not a problem if you like that look, but we wanted these to stay black and hold up. The carriage bolts that tie all the 1x3's are stainless. We spray painted them black to match the stuff from Snug Cottage. It would have been ideal to connect the hinges via through bolts, but it was impossible with the attachment at the corner of the buildings. We opted for exterior Spax lags, also spray painted black to match. We oriented the hinges so the gates hang on the lags in a shear arrangement, there is only weight on the threads when the gate is open. Overall span of both gates is 122".
The gates are finished with one coat of Sikkens Cetol SRD in natural color. We did a fair amount of research on this. The #1 choice for exterior finish is Epiphanes varnish. We have a friend who did his deck chairs with it several years ago and they still look great. The product is $45 a quart, and requires seven (!) coats. We ruled that out straightway. The Sikkens Cetol 1 and 23 is a two-step finish that is supposed to be extremely UV resistant. It's $85 a gallon, and you must buy a gallon of each. That was also out of our price range. The Cetol SRD gets great reviews, and is $45 a gallon. We were tempted to simply leave the gates unfinished, and they may eventually end up that way, but for $45 we figured we'd give the SRD a shot. It only requires one coat. Needless to say, we were pretty thrilled with how the gates turned out with the finish applied.
Next on the docket, Tony Konovaloff's trestle table from FWW #106. I've wanted to build this piece since the first time I laid eyes on it when I was 20 years old. We may have enough cedar left over to make it.
We shot some video during part of the build. No music, and little editing in this one. We wanted to show the natural pace of work more than anything, and also how sweet the new Glide is for holding big stuff. It's so great to be able to hold massive timbers with only a little flick of the wrist.
Thursday, September 18, 2014
Spagnuolo's Glide M
Video link
Late last night we received the following email from Marc Spagnuolo:
Finished up the final part of the retrofit today, including both the new Glide and the Crisscross. All I can say is wow!! I am able to close the vise from a full open position with a quick flick of the wrist. And the hold is strong enough for me to lift the bench with the workpiece. That's without the suede on the chop! Incredible.
Just wanted to let you guys know you once again impress the heck out of me with the quality of the hardware!
marc
In case you've been sleeping under a rock for the past few years (and we feel ridiculous even saying this) Marc owns and operates the online woodworking community/school The Wood Whisperer. Marc built our Split Top Roubo as one of the Guild builds a few years ago. Until we get time (and develop a personal relationship with Francis Ford Coppola) Marc's video series is still the best option for building our bench if you need visual step by step instructions. Marc covers all the bases in minute detail, and gives you more info than you need (the good kind of more.) We imagine Marc will be covering his retrofit on the Wood Whisperer website in the future.
Monday, September 8, 2014
DymondWood is No More
In March we announced that we'd be replacing our Cocobolo knobs with DymondWood, an acrylic-infused and pressure-laminated plywood product that looks very much like Cocobolo, but has none of the drawbacks of rare rosewoods.
But it turns out that DymondWood is now rarer than Cocobolo. Sadly, the company that manufactured DymondWood completely burned to the ground a couple weeks ago. Rutland Plywood of Rutland Town, VT, was totally lost in a 5-alarm fire on August 21.
Right now we're not sure what we'll be replacing the DymondWood knobs with. With cocobolo now on the CITES list, we're not keen on replacing the knobs with anything in the Dalbergia family. And plain acrylics or plastics just don't cut the mustard for us. After true rosewood, and the excellent DymondWood, everything else seems like a downgrade. And to our knowledge, no one is making a DymondWood-like product.
Next week we'll be turning some samples in various woods (likely acrylic infused) to see what might fit. We'll be shipping Glide M leg vises and Tail Vises with what remaining DymondWood stock we have. We estimate we'll be out in about two months at best.
The New Glide - Top Clearance
We've received a few emails over the weekend about the new dimensions of the Glide M and C. Here are some clarifications.
The Glide M handwheel is identical to the previous model, save for the locations of the knob mounting holes. The wheel itself has not changed. It's the same diameter, weight, and depth. Again, no changes other than the knob locations.
The Glide C also has the exact same specs as the Glide M (diameter, etc.), except it has a sand-cast surface, not machined.
The overall radius of the Glide M and Glide C handwheels is 6-1/2". That's the distance from the center of the acme screw to the tip of any of the knobs.
Here's where you might run into trouble. If you position the Glide less that 6-1/2" from the top of the bench to the center of the screw, the knobs will be above the top surface of the bench when in the 12 o'clock position.
But here's also why no one should ever run into this situation. In the vast majority of benches there will be oodles of room between the benchtop surface and the top of the Crisscross hardware. In an average bench (height 34") you can start the Crisscross mortise 1" above the floor, mount the Glide 1-3/4" above the Crisscross, and still have over 11" above the screw. That's huge. See below.
And if you're bench is really, really short, like 29", you can still mount the Glide and Crisscross without the knobs breaking the top plane of the benchtop. See below.
So, to sum up, mount your Glide and Crisscross as low as you can (we repeat this numerous times throughout the installation instructions). There is no reason to mount it higher, and thus sacrifice capacity above the screw.
Monday, September 1, 2014
Now In Stock - The New Glide and More.
Here at Benchcrafted we're always tweaking our designs to make them as sweet as we can. Of course the dilemma in all this is that we risk slighting past customers when we change a product. Here's how we see it. Our past offerings were the best we had to offer at the time. There are companies out there (big ones usually) where planned obsolescence is part of day to day business. Not us. Here, we design and build for the long run, but now and then we get ideas that are genuine improvements and we can't sit on them. Our motivation is to make great stuff, and share it with our fellow woodworkers.
About a year ago we started experimenting with a Glide Leg Vise in our test shop. I've always been intrigued by ship's wheels, and the ergonomics and physical dynamics of why they work. A large wheel gives lots of leverage, and the handles provide an efficient way for a human to transfer their energy into turning the wheel. If the wheel were without handles, one would have to grip a rather thick section of wheel and use enormous amount of energy just maintaining that grip. My Northfield 16" jointer adjusts by means of a large cast iron ship's wheel. I can rotate it with a single finger on one of eight handles as it moves hundreds of pound of cast iron.
We had a reject bronze Glide wheel from a previous run so we drilled and tapped the rim of the wheel to accept six of our rosewood (now Dymondwood) knobs. We were immediately struck by the improved ergonomics of this arrangement. Spinning the handwheel for gross adjustments was simply of matter of flicking one of the knobs. The wheel, as usual, would spin for several revolutions. We also noticed another improvement. With no knob mounted to the front of the wheel, the entire vise was lower profile--no more bumping a leg into the knob or catching a pocket as you walk by. With knobs oriented symmetrically about the perimeter, the wheel was also balanced, allowing it to spin more smoothly.
But as cool as the six-knob bronze ship's wheel looked (batten down the hatches!) and functioned, we found a problem. Six knobs was three knobs too many, so we removed every other knob. Bingo. This placed a knob at 10 o'clock and 2 o'clock or any point in between. In other words, there was always a knob within easy reach at the top of the vise. Perfect.
But we weren't finished. On the heels of releasing the Classic Leg Vise we decided to swap out the standard single-lead screw (that we've always used on the Glide) for the double-lead screw we use on the Classic. The results? A turbo-charged Glide. One revolution of the wheel now yields 1/2" of travel, vs. 1/4" of the previous Glide. And there's no change in the feel of how the vise holds, due to the effect of the larger lever when adjusting the vise with the knobs (I still grab the rim from time to time.)
The Glide M features our fully-machined cast iron handwheel that is designed, cast, and machined entirely in the USA. The handwheel is outfitted with three Dymondwood knobs turned and finished to a high level in the USA, and mounted with our proprietary fasteners. The Glide M automatically includes a Crisscross mechanism (choose Solo or Retro.)
Price is $439 with a Crisscross Solo, and $479 with a Crisscross Retro.
With the added costs of the additional components, we weren't comfortable with the higher price of the Glide M.
The Glide C features a cast-iron handwheel that we're leaving un-machined to save on cost. The wheel has the same weight and feel in use as the machined Glide M wheel. Both vises perform identically. The difference is entirely cosmetic.
The Glide C uses acrylic-infused Beech knobs. The combination of the un-machined wheel and the Beech knobs not only mean a less expensive vise, but also a more traditional look. I have a Glide C on my ash Roubo bench at the moment. I love the look.
In case you're wondering, we do have a Tail Vise C in the works, so you'll be able to completely outfit your bench with matching vises. And yes, the Tail Vise C will also cost less than the current Tail Vise (which will become the Tail Vise M.)
A word on the infused Beech knobs. These are incredibly tough. They are as durable as solid acrylic, but with the feel and look of wood. They won't split or move. If you know the infused mallets made by Dave Jeske of Blue Spruce toolworks, these knobs are the same. In fact, Dave turns all of our vise knobs from the same stuff. They are impeccable in every way.
Price is $369 with a Crisscross Solo ($40 less than the previous "Glide Crisscross"), and $409 with a Crisscross Retro.
Retrofitting your bench with a Glide M or Glide C
The Glide M and Glide C components are not interchangeable with previous versions of the Glide. We've never encouraged upgrading parts of our vises anyway, since that relegates the obsolete parts to the recycle bin. To us it makes more sense to sell your current vise, give it to a friend, donate it to a school, or hang it on your mantle as a piece of industrial art (okay, maybe that's going too far).
If you do upgrade to a Glide M or C, and you currently have a Glide and Crisscross installed in your bench, you'll have to attach the new nut, patch your square acetal bushing mortise and cut a new, round mortise for the round acetal bushing. The existing tapped holes on your chop should work just fine with the Glide M or C.
We'll be uploading the new installation instruction (see our downloads page) for the Glide M/C which also include the Crisscross instructions. We're constantly revising and improving our instructions to make your installs as smooth as possible.
Split Top Roubo Workbench Plans
Its been about two years since we did away with the Split Top Roubo's parallel guide and replaced it with a Crisscross. Unfortunately we haven't had a chance update the STR plans to reflect this.Yes, we've been lax on this and it has caused a bit of confusion. Apologies. We do address the changes in the Glide installation instructions, and the STR Construction notes (both of which have been recently updated to further emphasize the changes.) The bad news is we lost our hard drive that contained the plans as we were updating them, and believe it or not, we also lost two backup drives as well. Computers! The good news is we're back on task and working diligently to get the plans totally updated as soon as possible. They will be better than ever.
See our stuff at WIA in two weeks
We had hoped to return to WIA this year, but the location and timing unfortunately did not work out for us. Maybe next year. However, if you're planning on attending WIA, Plate 11 Bench Company will have one of their benches outfitted with a Glide M, as will the Sterling Tool Works booth. If you're in the market for a finely made bench, Mark Hicks does excellent work and will build you a complete bench, or furnish you with a kit of parts ready to assemble. And Chris Kuehn's Saddle Tail is hands down the best dovetail marker I've ever used. Crisp and precise machining, beautifully made. I have the whole set, including the leather holster.
You can order a Glide M now through our Store page. The Glide C is still in production and will be ready to ship in 3-4 weeks. Watch for an announcement here in the next couple weeks. Tail Vise C's are also still in production and will be ready to purchase, we estimate in a couple months.
Later this fall, Glides will be also available through several of our dealers.
Subscribe to:
Posts (Atom)