Wednesday, October 31, 2012
WIA Cincinnati 2012
This is a post we've struggled to write. For the first time since its inception in 2008, Benchcrafted won't be at WIA this year. We've traveled all over the country to attend this event, but this year the WIA schedule simply proved to be too difficult to fit in for us. We're going to miss visiting with old and new customers alike, and spending time (always too limited) with our fellow hand-tool enthusiasts, which always proves to be enormously motivational and inspirational. Coming home from WIA always has me personally itching to make furniture and new Benchcrafted products.
The upside to us not attending is this. We're focusing on keeping vises in stock, and getting our newer products on the shelf quicker and more efficiently.
We won't be entirely absent from WIA however. Our good friend Raney Nelson of Daed Toolworks asked us a few weeks ago if we had an extra demo bench we could spare for the show. Well, of course we did, since we won't be there. The bench we sent for the Daed Toolworks booth features our new handwheels on both the tail vise and Glide leg vise, as well as a production prototype of the new Crisscross. If you stop by DTW's booth, do yourself a favor (and be cordial to Raney) and try out his hand-made infill planes before bombarding him with questions about our stuff (he uses Benchcrafted vises in his furniture shop too) That's Raney in the picture at the top.
I've also heard through the grapevine (read, Jeff Miller) that Andy Brownell will be bringing his Split Top Roubo (with our vises) to demo in the Gorilla Glue booth. If you glance over at the big Gorilla Glue sign and think "eh, its just glue" you're doing yourself a disservice. Andy always brings a project to the show (and Andy builds NICE furniture) and works on it in real time for the entire weekend. I'm guessing he'll also have his traveling Anarchist's tool chest along as well. I've seen it. It's gorgeous.
Friday, October 26, 2012
Benchcrafted's Autumn Tent Sale
When we have a tent sale, we do it up right. First we call Ahmed the tent guy, and he comes over in a busted Land Rover, sets up the tent with some cousins. After a short nap, some tea and sweets, he then takes off his 1998 NIB Tommy Hilfiger shirt and Gap jeans, dons his white robe and picnic tablecloth do-rag and sets up to offer the best deals this side of Damascus.
Of course there is no actual Benchcrafted Autumn Tent Sale. But we do in fact have some things that we'd like to sell. And we like tents, incidentally. These are demo vises, or blems, or the only pair of vises that someone has returned to us. Unopened. Um, we're not kidding about the latter. We've had one return since we started this. Yeah, one return. That's one. Just one. Only one. Okay, onto the goods.
Note: All vises listed below feature our previous handwheel (pictured below)
Item #1 SOLD
Tail Vise. Brand new. Unopened. $339
Item #2 SOLD
Glide Leg Vise. Brand new. Unopened. $319
Item #3 SOLD
Glide Leg Vise. Demo (lightly used, no visible or functional wear) $295
Item #4
Glide Leg Vise. Blem (some casting voids on the back side of the handwheel where you'll never see them) $295 SOLD
Item #5 SOLD
Moxon Vise. Blem. Some roughness in the casting. No functional deficits. $129
Item #6 SOLD
Moxon Vise. Blem. Some roughness in the casting. No functional deficits. $129
Item #7 SOLD
Glide Leg Vise. Demo (lightly used, no visible or functional wear) $295
Item #8 SOLD
Glide Leg Vise. Demo (lightly used, no visible or functional wear) Baked flax finish on the handwheel. $295
Item #9
Handwheel knob. These are the rosewood knobs we use on our handwheels (see pic above). These didn't meet spec, but are completely functional with a little TLC. Sometimes the knobs are a tad wet when we turn them, and the hole becomes oblong. A quick pass through with a rat tail file should get them spinning nice. We usually hold onto these and replace every handwheel knob on our shop machines with these, but we've done as much as we can of that. These fit a 3/8 X 1-3/4 shoulder bolt. $6
Item #10
Handwheel knob. Same as item #9, only these fit a 1/2 X 1-3/4 shoulder bolt. $6
Shipping is not included. To buy anything, drop an email to info@benchcrafted.com with a list of what you want, and your mailing address. We'll email you a bill for the goods and shipping.
Now, where's Uncle Tannous gone with my Shawarma.....
Saturday, October 20, 2012
Glide Instructions Update
FYI, We've uploaded the latest version of our Glide Leg Vise Instructions. We corrected a couple typos and deleted some superfluous information.
See our downloads page.
Wednesday, October 10, 2012
Galbert And Zajicek
Its 6 am and I'm rooting through my neighbor's trash. I come across some vinyl records. The album cover says in bold, goldenrod text "Broadway Musicals: Galbert and Zajicek's Greatest Hits."
And then I wake up.
Yesterday I went to bed thinking of two new tools I got in the mail this week. I don't do tool reviews on this blog, but I do occasionally post about tools that excite me.
I got a call from my friend Bob Zajicek earlier this week about a new marking knife he's about to release. The Kerf Kadet Carbide features, wait for it, a carbide blade (didn't see that coming, right?) ground to perfection by Czeck Edge master tool grinders. The knife came razor sharp, and didn't seem brittle like I was expecting it to. It scribed crisp lines across a piece of beech. The blade is .030" thick for getting between skinny pins, or other skinny places. Why carbide? Why not? It holds an edge like, a really long time, so you don't have to sharpen as often. I can sharpen, but I don't ever do it for fun. Does it take a keen edge? Ask Bob about his experience assembling these knives. But don't if you're squeamish. It's sharp.
Call my Czeck (Edge) friend Bob at bobzajicek1@gmail.com for more info.
And now for the tool that will change the way I work.
The Chairnotes Travisher
I've been corresponding with Peter Galbert for some years now. Mostly because he builds my favorite modern chairs, but also because I hope I'll become close enough that he'll give me a free chair making lesson. Okay, that last bit is completely untrue. I actually want several lessons. Anyway, a couple months ago, in my measly attempt to convince myself I'm a budding chairmaker, I drew up some Sketchup prints for Peter's Smarthead shaving horse. (I have yet to build one.) In the process, Peter's travisher caught my eye. And I figured that even a budding chairmaker needs a good travisher, so I ordered one from Pete.
Last week it arrived. As I opened the box I knew I had a special tool in my possession. The crisp arrises, flowing curves, velvety walnut, glimmering steel and lustered brass, the entire tool floored me. This collaboration between Peter Galbert and his assistant Claire Minihan (see their initials emblazoned in the tool's throat) has become my new favorite tool.
In fact, just by possessing it, I now feel I can claim the title of master chairmaker. Okay, that's going a bit far. But this is truly one sweet tool. I took some shavings from a piece of dry walnut with the travisher and something hit me. I've never made a chair seat, but I immediately knew that this tool would be seeing some serious use in applying some textural elements to my other furniture work.
But enough talk. Here are some pics of my new travisher. For more info, visit Pete's site Chairnotes Tools.
Monday, October 8, 2012
Glide Instructions Update
We've made a change to the Glide Leg Vise acetal bushing that increases the performance of the Glide when used with the Crisscross. The bushing has always been used for lateral stability (left / right) of the screw. In order to make the installation a smidge easier we're now shipping all Glide vises with our improved bushing. The central hole is now elongated vertically to allow more freedom of movement and wiggle room during the installation process. It's a little tweak, that's it. If you currently use a Glide with a round hole in the bushing, don't think about upgrading. Your current vise will work fine with it. If, however, you will be installing a Crisscross in a Glide with the old bushing, you may want to upgrade. We'll have ordering details shortly before the Crisscross is ready to ship. As always, stay tuned to this blog for all the latest product news here at Benchcrafted.
To download the latest Glide Instructions (page 19 shows the bushing details) visit our downloads page here: http://www.benchcrafted.com/Downloads.html
Monday, October 1, 2012
Come to Handworks Next May
Next May a bunch of modern hand tool makers are getting together in a restored dairy barn right in the middle of the communal village of Amana, Iowa.
This event has been in the making for a few years, and we're excited to be one of the exhibitors. Basically, it's a couple days for all us hand tool enthusiasts (makers and users alike) to get together and talk tools with each other, learn about the maker's wares, enjoy each other's company, get inspired, and, oh yeah, sell and buy some tools! Anyone and everyone is invited, and admission is free. To boot, there are some phenomenal door prizes being given away.
Amana is actually the name of several tiny villages scattered over about a 5 mile swath of Iowa countryside. Amana was established in the 19th century by German immigrants after they came from the old country in search of a place to settle their utopian society. The society actually still exists, albeit in a more tourist-friendly format. In other words, all the old-world crafts are still practiced in the various villages. And there are furniture shops still in business, plus a broom shop, brewery (excellent craft beer!), smokehouse, blacksmith shop, laceworks, and a world-class woolen mill. Follow the Amana Colonies link at the Handworks website for more.
Handworks takes place on May 24-25. There's lots to do in Amana after Handworks, to take advantage of the holiday weekend. Antiquing, museums, functioning craft shops, restaurants, and wineries. Consider bringing your significant other and family to make the best out of the weekend.
Hope to see you there!
Friday, September 28, 2012
Crisscrosss Pricing
As promised, below is pricing on the forthcoming Benchcrafted
Crisscross.
We'll be offering the Crisscross in two separate configurations depending on the installation method. Either version will work with any leg vise.You don't need a Benchcrafted Glide to use the Crisscross.
Crisscross
Crisscross Solo $99 (pictured above)
The upper ends of the Crisscross arms pivot on two 3/8" steel rods. In order for the Crisscross to function properly, these two rods must be parallel with each other, and perpendicular to the two arms. If you're building a new bench (or a stand-alone vise) where you can drill accurately for these pivot rods using a drill press, the Crisscross Solo will suit your needs. All necessary hardware is included to install the Crisscross Solo with a leg vise of your choice. This version will take less time to install than the Retrofit (see below). However, the Crisscross Solo is less forgiving to install. You need to be accurate about your pivot rod locations and get them straight through the leg and chop. If you make a mistake, you'll have to relocate the pivot rods. We'll cover this in detail in the forthcoming installation instructions.
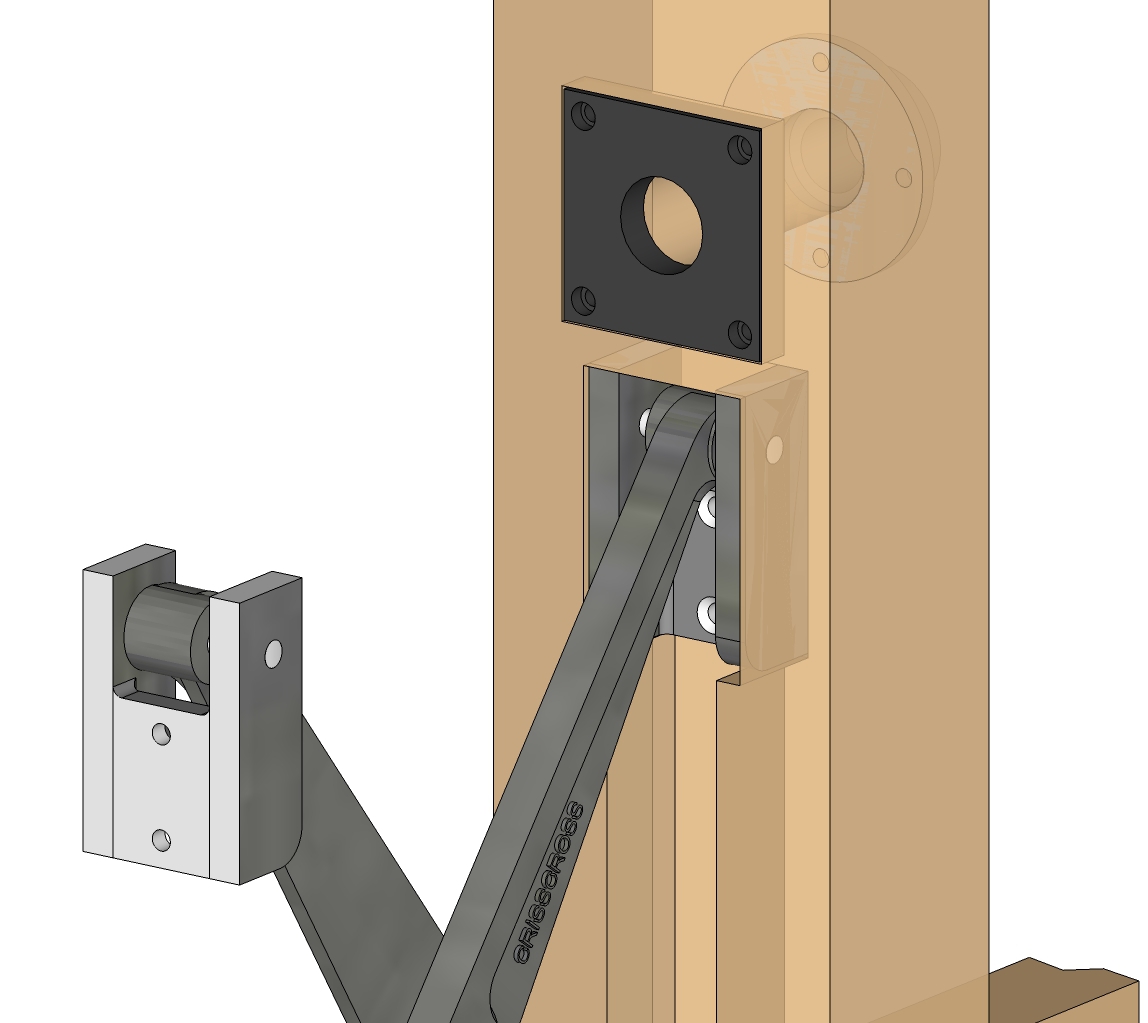
Crisscross Retro $139 (pictured above)
If you'll be retrofitting a Crisscross to an existing bench, where it would be difficult to drill deep, straight holes for these pivot rods through thick wood by hand (since it will likely be impossible to drill an assembled bench leg using a drill press) the Crisscross Retro will be the better choice. The Retro includes two machined cast iron brackets that automatically provide accurately positioned pivot rod holes. All you have to do it excavate a slightly wider section of the mortise in your leg and chop, and simply screw the brackets in place. No deep drilling required. You may choose to use the Retro version even in new construction, in order to simplify the process and help achieve accurate pivot pins.
Glide Leg Vise w/ Crisscross
We're also offering a special price when you purchase a Glide Leg Vise along with a Crisscross. (These packages DO NOT include roller bracket hardware, which are not needed with the Crisscross)
Glide Crisscross Solo: $399
A Benchcrafted Glide Leg Vise with a Crisscross Solo. Everything you need to build a Glide Leg Vise with a Crisscross, except for wood.
Glide Crisscross Retro: $439
A Benchcrafted Glide Leg Vise with a Crisscross Retro. Everything you need to build a Glide Leg Vise with a Crisscross, except for wood. This includes the two machined brackets.
Shaker Benchmaker's Package w/ Glide Crisscross Solo: $829
Shaker Benchmaker's Package w/ Glide Crisscross Retro: $869
For customers who purchased a Glide leg vise between February 1st, 2012 and September 1st, 2012, we will offer free domestic shipping (a $16.00 average value) on both Crisscross Solo and Crisscross Retro. This, of course, does not apply to other purchases. It's for the Crisscross Solo or Retro only. For international Glide owners, we'll give a prorated discount. Inquire for rates.
To get free shipping, simply order a Crisscross, then include a note with your order stating that you bought a Glide between those dates.
We'll be offering the Crisscross in two separate configurations depending on the installation method. Either version will work with any leg vise.You don't need a Benchcrafted Glide to use the Crisscross.
Crisscross
![]() |
Crisscross Solo $99 (pictured above)
The upper ends of the Crisscross arms pivot on two 3/8" steel rods. In order for the Crisscross to function properly, these two rods must be parallel with each other, and perpendicular to the two arms. If you're building a new bench (or a stand-alone vise) where you can drill accurately for these pivot rods using a drill press, the Crisscross Solo will suit your needs. All necessary hardware is included to install the Crisscross Solo with a leg vise of your choice. This version will take less time to install than the Retrofit (see below). However, the Crisscross Solo is less forgiving to install. You need to be accurate about your pivot rod locations and get them straight through the leg and chop. If you make a mistake, you'll have to relocate the pivot rods. We'll cover this in detail in the forthcoming installation instructions.
Crisscross Retro $139 (pictured above)
If you'll be retrofitting a Crisscross to an existing bench, where it would be difficult to drill deep, straight holes for these pivot rods through thick wood by hand (since it will likely be impossible to drill an assembled bench leg using a drill press) the Crisscross Retro will be the better choice. The Retro includes two machined cast iron brackets that automatically provide accurately positioned pivot rod holes. All you have to do it excavate a slightly wider section of the mortise in your leg and chop, and simply screw the brackets in place. No deep drilling required. You may choose to use the Retro version even in new construction, in order to simplify the process and help achieve accurate pivot pins.
Glide Leg Vise w/ Crisscross
We're also offering a special price when you purchase a Glide Leg Vise along with a Crisscross. (These packages DO NOT include roller bracket hardware, which are not needed with the Crisscross)
Glide Crisscross Solo: $399
A Benchcrafted Glide Leg Vise with a Crisscross Solo. Everything you need to build a Glide Leg Vise with a Crisscross, except for wood.
Glide Crisscross Retro: $439
A Benchcrafted Glide Leg Vise with a Crisscross Retro. Everything you need to build a Glide Leg Vise with a Crisscross, except for wood. This includes the two machined brackets.
Benchmaker Packages
Split Top Roubo and Shaker Benchmaker's packages will also be available with the Glide Crisscross.
Split Top Roubo Benchmaker's Package w/ Glide Crisscross Solo: $809
Split Top Roubo Benchmaker's Package w/ Glide Crisscross Retro: $849
Shaker Benchmaker's Package w/ Glide Crisscross Solo: $829
Shaker Benchmaker's Package w/ Glide Crisscross Retro: $869
Pre Ordering
Crisscrosses, Glide Crisscrosses, and Benchmaker's Packages with Crisscross are available for pre-ordering now on our Store page.
Special discount for past Glide customers
For customers who purchased a Glide leg vise between February 1st, 2012 and September 1st, 2012, we will offer free domestic shipping (a $16.00 average value) on both Crisscross Solo and Crisscross Retro. This, of course, does not apply to other purchases. It's for the Crisscross Solo or Retro only. For international Glide owners, we'll give a prorated discount. Inquire for rates.
To get free shipping, simply order a Crisscross, then include a note with your order stating that you bought a Glide between those dates.
Lead times
Ship
date for the first run of Crisscrosses is December 3. If we complete
the run early, we'll ship before then. Depending on demand, we may sell
out quickly. Order now to increase your chances of getting your
Crisscross soon.
More info
To view everything we've published about the Crisscross, follow this link. This
includes installation details, dimensions, demo videos. Everything. In
the coming weeks we'll update the website with a Crisscross page and
installation instructions.
Thursday, September 20, 2012
Crisscross Installation - A Preview
For the past week we've been putting in long days packing vises. Yes, we're happy to say that we're shipping vises again. If you've ordered in the past two months (ouch!) your vises may have already gone out, or you'll be hearing from us very soon about shipping details. So keep your eyes peeled for notifications in your inbox. By this time next week, all open orders should be filled.
Now, for those of you who are looking to install a Crisscross we have some good news. We've been preparing some drawings for you. We don't normally recommend that you cut into your bench before the hardware is in hand. But in this case you can feel fairly safe in doing so. The mortise for the Crisscross is fairly straigh forward. It'd be pretty hard to goof up. If you're not 100% confident though, better wait. Study the drawings and instructions carefully and lay out everything in actual size on your bench parts before cutting anything. A couple weeks ago we prepped nine benches for Crisscrosses, so we've got virtually all the install bugs worked out. If you have any questions or concerns, post them as comments below so all can benefit.
The best way to excavate the long Crisscross mortises is on a drill press with a large Forstner bit. This will hog out tons of material in short order. Then clean up the little crescent shapes with a router and fence, or simply with a paring chisel.
You can also do your base joinery based on the drawings in the PDF.
If you have a Glide in hand (or other leg vise hardware like a simple bench screw) do not install it yet. There is an installation sequence to be followed to allow the Crisscross and Glide (or bench screw) to work best with each other. We'll cover that in more detail when the Crisscross instructions are finalized.
Now I'm sure you're wondering when the Crisscross will be available, and how much it will cost. We're very close to having pricing finalized. Should be within a week. As for production date, probably sometime in November. Definitely well before Christmas.
Here is the link to download the PDF:
Crisscross Installation Preview
Thursday, September 13, 2012
Gallery of Benches

Take a look at some of the benches produced by members of Marc Spagnuolo's Wood Whisperer Guild. Click here for the gallery.
Marc has made some changes to the Guild site of late, but most notably you can now purchase projects ala carte. The Split Top Roubo is $100. Right now, this is as close as you'll get to one-on-one instruction on building our bench. We've seen all the videos. They are excellent. Marc has solid techniques, but he also offers alternatives for those versed in different schools of work.
Definitely worth the money if you're a beginning woodworker looking to build a solid bench.
Monday, September 10, 2012
Teaching At Kelly Mehler's, or How To Build A Bench In a Tropical Storm
Last week I drove through the remnants of Hurricane Isaac towards Berea, Kentucky to teach a week-long class in building our Split Top Roubo bench. After 10 hours driving through constant rain, I was hoping for clear skies the rest of the week. And that pretty-much guaranteed that it would rain during the entire class.
Building nine full-size benches in any shop is demanding work, so the plan, as it usually is at Kelly Mehler's Woodworking School, is to do the big, heavy work outside in the yard. But how does one do that when its raining at the worst possible moments?
Tarps. Shouting. Scrambling. Cursing. Tarps.
By week's end, the yard in front of Kelly's looked like a rainy day at Woodstock. And any one of the motley crew of haggard woodworkers could have doubled as walk-ins on an episode of Dukes of Hazzard. Except for Mike. Where do you get those self-renewing clothes? He looked as fresh at 9pm as 9am.
I learned a few things last week about building two tons of hard maple workbenches in wet conditions.
- Blue-colored tarps, no matter how thick, or how expensive, by default are always junk.
- Other-colored tarps are also junk.
- It always starts raining when everyone is upstairs in the middle of a glue up
- When the humidity is 99% and you drill a hole for a metal part to go through, 2 minutes later you'll need to redrill that hole because it will have shrunk. After another 2 minutes, redrill again. Repeat for every 2 minute interval thereafter.
- Vise manufacturers should forget, no REALLY forget, every metalworking tolerance when building ten benches in one week.
- When hard maple gets wet it looks really pretty. It also sticks to every cast iron machine surface like Looney Tunes Acme glue.
- Wear saftey glasses when 10 people start whacking drawbore pegs. Oak shrapnel!
- It's actually possible to install a Benchcrafted Tail Vise in the rain. But I wouldn't recommend it.
- A 4" thick, hard maple workbench top that has sat out all night in a torrential downpour will be wet (and pretty) in the morning, but it will be just fine. Like Kelly said, "that tree's been through a lot in its lifetime" (a little water isn't going to hurt it.) A 4" top is prit near indestructible.
I'm convinced that school director Kelly Mehler, who prepped the thousands of board feet of hard rock maple required for the class, is some sort of hybrid being with Olympic energy, patience, wisdom, and wit. Someday I will return to Kelly's as a student. That may be my only ticket back in the place!
Subscribe to:
Posts (Atom)